DNS Name Resolution In Azure
Posted on December 11, 2022
- and tagged as
- azure
In this post we’re going to cover the services and features Azure provides for DNS name resolution inside the cloud and to multi-cloud/on-prem resources.
We’ll be covering
- Azure Provided DNS
- Public DNS Names for Azure VMs
- Azure DNS Private Zones, and
- Azure DNS Private Resolver
Azure Provided DNS
Azure Provided DNS is the default name resolution service provided by Azure. When you spin up a VM the default DNS server configured in the VM is 168.63.129.16. This is the Azure Provided DNS service, it can handle name resolution for public names as well as name resolution inside a VNet.
Each VM within a VNet will have a DNS suffix resembling <unique-id>.internal.cloudapp.net and this suffix will be identical for every VM inside the VNet. Each VNet will have a different suffix. Azure Provided DNS can handle name resolution between VMs inside a VNet that share the same suffix but will not perform name resolution for VMs in another VNet, even if peering is established.
I’ve set up a small lab environment as shown below to demonstrate the different DNS services offered in Azure.
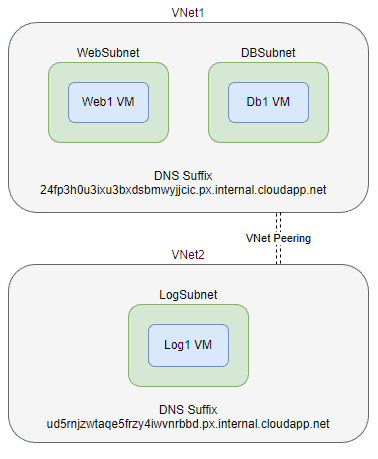
In this diagram we have two VNets with two different DNS Suffixes which are inherited by the VMs. Web1 and Db1 will be able to resolve each other’s hostnames using the Azure Provided DNS service, but neither will be able to resolve the Log1 VM which is in a different VNet.
Let’s confirm that.
Web1
PS C:\> ipconfig /all

Windows IP Configuration

   Host Name . . . . . . . . . . . . : Web1
   Primary Dns Suffix  . . . . . . . :
   DNS Suffix Search List. . . . . . : 24fp3h0u3ixu3bxdsbmwyjjcic.px.internal.cloudapp.net


PS C:\> Resolve-DnsName db1

Name                                                    Type TTL Section IPAddress
----                                                    ---- --- ------- ---------
db1.24fp3h0u3ixu3bxdsbmwyjjcic.px.internal.cloudapp.net A    10  Answer  10.0.2.4
Let’s have a look at Log1.
Log
PS C:\> ipconfig /all

Windows IP Configuration

   Host Name . . . . . . . . . . . . : Log1
   Primary Dns Suffix  . . . . . . . :
   DNS Suffix Search List. . . . . . : ud5rnjzwtaqe5frzy4iwvnrbbd.px.internal.cloudapp.net


PS C:\> Resolve-DnsName "web1.24fp3h0u3ixu3bxdsbmwyjjcic.px.internal.cloudapp.net"

Resolve-DnsName : web1.24fp3h0u3ixu3bxdsbmwyjjcic.px.internal.cloudapp.net : DNS name does not exist
At line:1 char:1
+ Resolve-DnsName "web1.24fp3h0u3ixu3bxdsbmwyjjcic.px.internal.cloudapp ...
+ ~~~~~~~~~~~~~~~~~~~~~~~~~~~~~~~~~~~~~~~~~~~~~~~~~~~~~~~~~~~~~~~~~~~~~
    + CategoryInfo          : ResourceUnavailable: (web1.24fp3h0u3i...al.cloudapp.net:String) [Resolve-DnsName], Win32Exception
    + FullyQualifiedErrorId : DNS_ERROR_RCODE_NAME_ERROR,Microsoft.DnsClient.Commands.ResolveDnsName
If we need internal name resolution between VNets Azure DNS Private Zones are good option, but before we move onto that let’s cover public DNS names for Azure VMs.
Public DNS Names for Azure VMs
By default an Azure VM won’t have a public DNS name even if it has a public IP address assigned, however, Azure will allow us to configure one under the <name>.<region>.cloudapp.azure.com scope.
This can be done during VM creation, here is an Azure CLI example, note the --public-ip-address-dns-name option.
az vm create `
	--resource-group Lab `
	--name Web1 `
	--image Win2019Datacenter `
	--subnet WebSubnet `
	--vnet-name VNet1 `
	--public-ip-address-dns-name "xkln-web1" `
	--admin-username md `
	--admin-password ((Import-Clixml ~/winpw.xml) | ConvertFrom-SecureString -AsPlainText)
It can also be done under the Public IP object assigned to the VM as the hostname is actually tied to the IP. Here is an Azure CLI example updating the public IP.
az network public-ip update `
	--resource-group lab `
	 --name Db1PublicIP `
	 --dns-name "xkln2-db1"
We can confirm both of these have successfully been applied.
PS C:\> az vm list --resource-group lab -d -o table

Name    ResourceGroup    PowerState    PublicIps     Fqdns                                       Location
------  ---------------  ------------  ------------  ------------------------------------------  -------------
Db1     lab              VM running    20.92.117.62  xkln-db1.australiaeast.cloudapp.azure.com   australiaeast
Web1    lab              VM running    20.58.162.1   xkln-web1.australiaeast.cloudapp.azure.com  australiaeast
And we can confirm name resolution from external nameservers, in this case Cloudflare.
PS C:\> Resolve-DnsName xkln-web1.australiaeast.cloudapp.azure.com -Server 1.1.1.1

Name                                           Type   TTL   Section    IPAddress
----                                           ----   ---   -------    ---------
xkln-web1.australiaeast.cloudapp.azure.com     A      10    Answer     20.58.162.1
There are a few things to be aware of when using Azure provided public DNS names for VMS.
Azure Public DNS Names Caveats
Your chosen hostname needs to be unique within the Azure provided scope for your region. If a VM is being provisioned (as in the az vm create example above) with a public DNS name that is already taken the entire VM creation process will fail with the following error.
{
   "status":"Failed",
   "error":{
      "code":"DeploymentFailed",
      "message":"At least one resource deployment operation failed. Please list deployment operations for details. Please see https://aka.ms/DeployOperations for usage details.",
      "details":[
         {
            "code":"BadRequest",
            "message":"{\r\n  \"error\": {\r\n    \"code\": \"DnsRecordInUse\",\r\n    \"message\": \"DNS record web1.australiaeast.cloudapp.azure.com is already used by another public IP.\",\r\n    \"details\": []\r\n  }\r\n}"
         }
      ]
   }
}
For this reason I tend to prefer the az network public-ip update method because it doesn’t risk having the entire VM provisioning process fail.
Azure is also strict about naming syntax, for example, no uppercase letters are allowed in the name. Take this Azure CLI example.
az vm create `
	--resource-group lab `
	--name Web1 `
	--image Win2019Datacenter `
	--subnet WebServers `
	--vnet-name VNet1 `
	--public-ip-address-dns-name Web1 `
	--admin-username md `
	--admin-password ((Import-Clixml ~/winpw.xml) | ConvertFrom-SecureString -AsPlainText)
Again the entire VM deployment will fail, this time due to the uppercase W in the desired hostname.
{
  "error": {
    "code": "InvalidTemplateDeployment",
    "message": "The template deployment 'vm_deploy_XTXRlGm2TjJTwdcfphUDRuRpLbuDFo54' is not valid according to the validation procedure. The tracking id is 'd93f739d-f5b2-4b1d-8113-b506550ac4bd'. See inner errors for details.",
    "details": [
      {
        "code": "InvalidDomainNameLabel",
        "message": "The domain name label Web1 is invalid. It must conform to the following regular expression: ^[a-z][a-z0-9-]{1,61}[a-z0-9]$.",
        "details": []
      }
    ]
  }
}
Lastly, if we create a VM configuration with no public IP address but specify a public DNS name, the DNS name will be ignored.
az vm create `
	--resource-group Lab `
	--name Db1 `
	--image Win2019Datacenter `
	--subnet DBServers `
	--vnet-name VNet1 `
	--public-ip-address '""' `
	--public-ip-address-dns-name db1-super-unique-name ` # This will be ignored as there is no public IP assigned
	--admin-username md `
	--admin-password ((Import-Clixml ~/winpw.xml) | ConvertFrom-SecureString -AsPlainText)
And that’s it on Azure Provided DNS. It is a very simple service which is free and provides minimally configurable DNS options. If you have a hybrid environment or multiple VNets and need name resolution between those resources, read on.
Azure DNS Private Zones
Azure DNS Private Zones gives us a manageable DNS zone within Azure. We can manually add records and we can link it to a VNet or multiple VNets and have VMs auto registered.
The configuration is simple so let’s go through a few examples. Here we create the Azure Private DNS Zone resource; all we need to provide is the Resource Group we want to hold our zone and the zone name.
az network private-dns zone create `
	--resource-group Lab `
	--name azlab.xkln.net
Next let’s create an A record.
az network private-dns record-set a add-record `
--resource-group Lab `
--zone-name azlab.xkln.net `
--record-set-name helloworld `
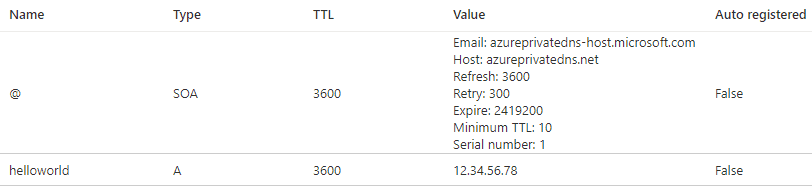
--ipv4-address 12.34.56.78We can confirm this is immediately present in our zone in the portal.
However, we still can’t resolve the helloworld hostname from our VMs.
Web1
PS C:\> Resolve-DnsName helloworld.azlab.xkln.net

Resolve-DnsName : helloworld.azlab.xkln.net : DNS name does not exist
At line:1 char:1
+ Resolve-DnsName helloworld.azlab.xkln.net
+ ~~~~~~~~~~~~~~~~~~~~~~~~~~~~~~~~~~~~~~~~~
    + CategoryInfo          : ResourceUnavailable: (helloworld.azlab.xkln.net:String) [Resolve-DnsName], Win32Exception
    + FullyQualifiedErrorId : DNS_ERROR_RCODE_NAME_ERROR,Microsoft.DnsClient.Commands.ResolveDnsName
In order to enable name resolution for our Private DNS Zone we need to link the zone to one or more VNets. This also gives us the option to enable auto VM registration. This will automatically create A records for our VMs in the zone.
az network private-dns link vnet create `
    --resource-group Lab `
    --name VNet1-To-azlab.xkln.net `
    --virtual-network VNet1 `
    --registration-enabled true `
    --zone-name azlab.xkln.net
We can now resolve the helloworld.azlab.xkln.net FQDN from the Web1 VM.
PS C:\> Resolve-DnsName helloworld.azlab.xkln.net

Name                                           Type   TTL   Section    IPAddress
----                                           ----   ---   -------    ---------
helloworld.azlab.xkln.net                      A      1800  Answer     12.34.56.78
Further, if we take a look at our zone we can see that the exiting VMs in our VNet have automatically been registered.

Let’s also link our zone to the second VNet and confirm that we now have DNS name resolution between VNets.
az network private-dns link vnet create `
    --resource-group Lab `
    --name VNet2-To-azlab.xkln.net `
    --virtual-network labVNet2 `
    --registration-enabled true `
    --zone-name azlab.xkln.net
And here our Web1 VM can now resolve the Log1 VM in the second VNet.
PS C:\> $env:COMPUTERNAME
Web1

PS C:\> Resolve-DnsName log1.azlab.xkln.net

Name                                           Type   TTL   Section    IPAddress
----                                           ----   ---   -------    ---------
log1.azlab.xkln.net                            A      10    Answer     192.168.0.4
One thing to note is that the DNS Suffix Search list has not changed inside our VMs, we need to specify the FQDN and not just the hostname for our name resolution to work.
PS C:\> ipconfig /all

Windows IP Configuration

   Host Name . . . . . . . . . . . . : Web1
   Primary Dns Suffix  . . . . . . . :
   DNS Suffix Search List. . . . . . : 24fp3h0u3ixu3bxdsbmwyjjcic.px.internal.cloudapp.net


PS C:\> Resolve-DnsName log1
Resolve-DnsName : log1 : DNS name does not exist
At line:1 char:1
+ Resolve-DnsName log1
+ ~~~~~~~~~~~~~~~~~~~~
    + CategoryInfo          : ResourceUnavailable: (log1:String) [Resolve-DnsName], Win32Exception
    + FullyQualifiedErrorId : DNS_ERROR_RCODE_NAME_ERROR,Microsoft.DnsClient.Commands.ResolveDnsName
Split Horizon with Azure DNS Private Zones
Private zones can be used to enable split horizon name resolution. This is for scenarios where we have publicly resolvable domains that return public IP addresses but we may want internal users to resolve a different IP (usually the locally accessible internal IP).
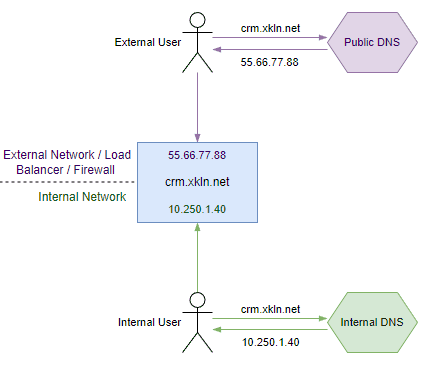
Our external user is out on the Internet and needs to access the CRM via the public IP, whereas our internal user can reach the server directly. When querying a public DNS resolver the external IP is returned and when querying an internal resolver the internal IP is returned.
Azure Private DNS Zones allow us to create zones for publicly resolvable domains. Let’s demonstrate this with a quick lab by creating a private zone for google.com. First, confirm name resolution from Web1 to the public Google IPs.
PS C:\> Resolve-DnsName google.com -Type A

Name                                           Type   TTL   Section    IPAddress
----                                           ----   ---   -------    ---------
google.com                                     A      186   Answer     172.217.24.46
Next we create our zone, add an A record, and link the zone to our VNet without enabling auto-registration.
# Create Azure Private DNS Zone
az network private-dns zone create `
	--resource-group Lab `
	--name google.com

# Create A Record
az network private-dns record-set a add-record `
	--resource-group Lab `
	--zone-name google.com `
	--record-set-name "@" `
	--ipv4-address 10.250.1.40

# Link the Zone to a VNet
az network private-dns link vnet create `
    --resource-group Lab `
    --name VNet1-To-google.com `
    --virtual-network VNet1 `
    --registration-enabled false `
    --zone-name google.com
Let’s try resolving google.com again.
PS C:\> Resolve-DnsName google.com -Type A

Name                                           Type   TTL   Section    IPAddress
----                                           ----   ---   -------    ---------
google.com                                     A      1800  Answer     10.250.1.40
There we have it, split DNS with Azure Private DNS Zones.
Azure DNS Private Zone Notes
-
No changes are required to our VMs or DNS server settings, they’re still pointing to the Azure Provided DNS default server of
168.63.129.16. As soon as the zone is linked to the VNet Azure begins using it automatically. -
You may have noticed we’re have to link DNS Zones to VNets. Not VMs, not subnets, but entire VNets. This may have architectural ramifications if different systems in your environment have different name resolution requirements.
-
If a VM is powered off or deleted in a VNet with auto registration enabled the DNS entry will be automatically removed.
-
If two VMs in different VNets have the same name the first VM registered will get and keep the DNS record. Should it be shut down or deleted the second VM will still not have a record created. Even rebooting the VM won’t trigger the registration, but what will work is updating the IP configuration of the NIC attached to the VM.
This takes care of name resolution inside Azure, but what if we have a hybrid environment and need to resolve names between on-premises and Azure? Or what if we have multiple Azure DNS Private Zones linked to different VNets and need name resolution between them? Read on 👇
Hybrid / Multi Domain / On-Prem Name Resolution
Azure DNS Private Zones allow us to have name resolution within a single DNS namespace which can stretch across VNets. What if you need name resolution across multiple DNS zones - either across VNets inside Azure, on to your on-premises Active Directory environment, or even in another cloud provider?
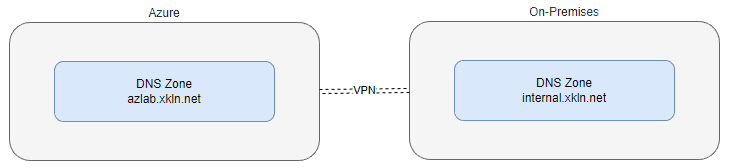
Prior to Azure DNS Private Resolver, which recently came out of preview, the guidance was to run a VM in each VNet and have those VMs provide DNS services. These DNS servers can then be configured with conditional forwarders to send requests to DNS servers in your other environments for their respective zones.
Here is the architecture diagram taken from the Microsoft documentation which shows this design.
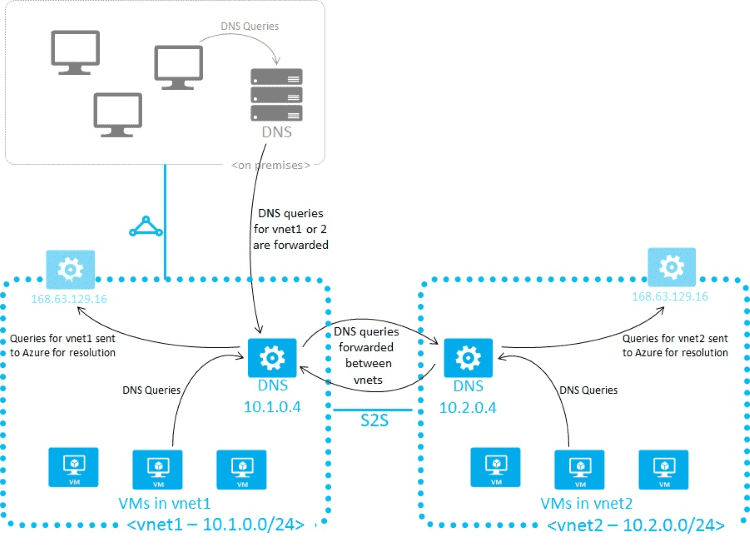
We’re not going to spend much more time on this approach as there’s now a better option, but it’s important to understand this was the previous recommended architecture. If you come across an environment which does name resolution in this fashion you will understand why.
While this old approach does work, running VMs for DNS isn’t very cloud-like and gives us more administrative burden than should be necessary. It also makes automation and infrastructure as code more complicated as one of our core services is sitting inside a bunch of VMs with no API.
So if that’s the old way, what’s the new and better way? Azure DNS Private Resolver. This removes the need for running DNS services inside VMs and gives us the ability to configure conditional forwarders for name resolution in and out of Azure.
Let’s explore.
Azure DNS Private Resolver
Azure DNS Private Resolver gives us two key features that have been missing
- The ability to define conditional forwarders for DNS zones external to Azure
- A resolver IP address to which we can send DNS queries for zones inside Azure
DNS Private Resolver doesn’t actually allow us to store any DNS records, we’re still using Azure DNS Private Zones for that, but it gives us the ability to create DNS forwarding rules and resolver IP addresses which will listen for DNS queries.
Here’s a quick lab environment so we can better see how it works. We’re going to emulate a connection between Azure and an on-prem environment by creating two VNets, the first of which will contain our “cloud” environment which will consist of a single VM, a Private DNS Zone, and an Azure Private DNS Resolver. The second VNet will contain our “on-prem” environment which will consist of Windows VM running DNS services and pretending to be a Domain Controller.
We’re going to configure Azure DNS Private Resolver to facilitate name resolution between these systems.
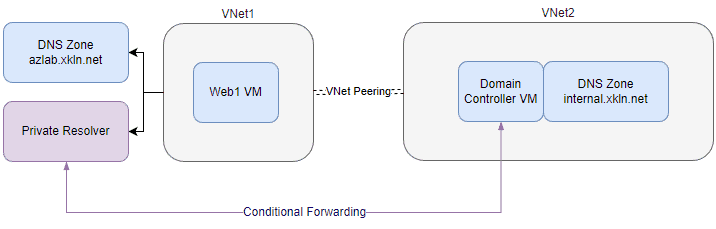
Previous sections have shown how to configure a Private DNS Zone, and VNet/VM/Peering configurations are well outside the scope of this post, so we’re going to assume the only missing component from the above diagram is the Private Resolver and Conditional Forwarding configuration.
Let’s first confirm we’re unable to resolve hostnames between the VNets.
From our ‘Cloud’ environment:
PS C:\> Resolve-DnsName dc1.internal.xkln.net

Resolve-DnsName : dc1.internal.xkln.net : DNS name does not exist
At line:1 char:1
+ Resolve-DnsName dc1.internal.xkln.net
+ ~~~~~~~~~~~~~~~~~~~~~~~~~~~~~~~~~~~~~
    + CategoryInfo          : ResourceUnavailable: (dc1.internal.xkln.net:String) [Resolve-DnsName], Win32Exception
    + FullyQualifiedErrorId : DNS_ERROR_RCODE_NAME_ERROR,Microsoft.DnsClient.Commands.ResolveDnsName
From our “On-Prem” environment:
PS C:\> Resolve-DnsName web1.azlab.xkln.net

Resolve-DnsName : web1.azlab.xkln.net : DNS name does not exist
At line:1 char:1
+ Resolve-DnsName web1.azlab.xkln.net
+ ~~~~~~~~~~~~~~~~~~~~~~~~~~~~~~~~~~~
    + CategoryInfo          : ResourceUnavailable: (web1.azlab.xkln.net:String) [Resolve-DnsName], Win32Exception
    + FullyQualifiedErrorId : DNS_ERROR_RCODE_NAME_ERROR,Microsoft.DnsClient.Commands.ResolveDnsName
We begin by creating the Private DNS Resolver. The az cli command requires us to specify the VNet using the unique ID so we need to obtain that first.
# Get VNet Id
$VNId = az network vnet list --query "[?name=='labVN'].[id]" -o tsv

# Create Azure DNS Private Resolver
az dns-resolver create `
	--resource-group Lab `
	--dns-resolver-name Resolv1 `
	--id $VNId
There are some additional objects we need to create and attach to our DNS resolver to make it useful. We need an Inbound Endpoint, which will be used to receive DNS queries from other systems. Creating an inbound endpoint will provide us with an IP Address that we can forward DNS requests to from our on-prem environment.
We also need an Outbound Endpoint, this is the egress side of the DNS resolver to which we will attach our conditional forwarding rules.
Both the inbound and outbound endpoint require their own subnets which are /28 or larger.
# Create the two subnets
az network vnet subnet create --resource-group Lab --vnet-name VNet1 --name Resolv1In --address-prefixes 10.0.255.0/28
az network vnet subnet create --resource-group Lab --vnet-name VNet1 --name Resolv1Out --address-prefixes 10.0.255.16/28
Once again when creating the Inbound and Outbound endpoints we need to specify the subnets via their unique Ids rather than just the name.
# Get Subnet Ids
$InSubnetId = az network vnet subnet list --resource-group Lab --vnet-name VNet1 --query "[?name=='Resolv1In'].[id]" -o tsv
$OutSubnetId = az network vnet subnet list --resource-group Lab --vnet-name VNet1 --query "[?name=='Resolv1Out'].[id]" -o tsv

# Create Inbound Endpoint
az dns-resolver inbound-endpoint create `
	--resource-group Lab `
	--dns-resolver-name Resolv1 `
	--inbound-endpoint-name Resolv1InEndpoint1 `
	--ip-configurations private-ip-address="" private-ip-allocation-method="Dynamic" id=$InSubnetId

# Create Outbound Endpoint
az dns-resolver outbound-endpoint create `
	--resource-group Lab `
	--dns-resolver-name Resolv1 `
	--name Resolv1OutEndpoint1  `
	--id $OutSubnetId
Even with this minimal configuration we can get an immediate benefit - we have an Inbound Endpoint which we can use to send DNS queries to from our “on-prem” system. Let’s pull the IP which has been assigned and configure our first conditional forwarder.
# Get Inbound Endpoint IP
C:\> az dns-resolver inbound-endpoint list --dns-resolver-name Resolv1 --resource-group Lab --query "[].ipConfigurations[0].privateIpAddress" -o tsv
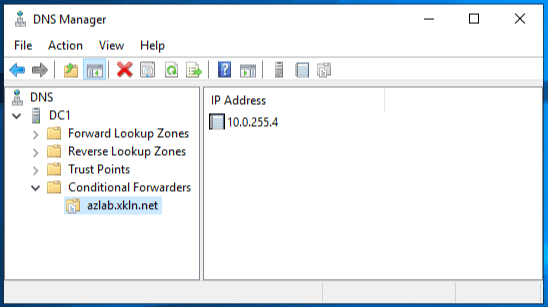
10.0.255.4With this we can configure a conditional forwarder inside our “on-prem” VM using PowerShell.
# Add conditional forwarder for azlab.xkln.net pointing to our Azure DNS Private Resolver
Add-DnsServerConditionalForwarderZone -Name azlab.xkln.net. -MasterServers 10.0.255.4
We can confirm this worked in the DNS Manager UI.
Finally, let’s try to resolve a VM in our “cloud” environment.
PS C:\> Resolve-DnsName web1.azlab.xkln.net

Name                                           Type   TTL   Section    IPAddress
----                                           ----   ---   -------    ---------
web1.azlab.xkln.net                            A      10    Answer     10.0.1.4
Excellent, we have name resolution from our “on-prem” systems to our Azure environment. Next let’s create the ruleset to allow our Azure resources to resolve names in our “on-prem” environment.
When creating the ruleset we need to reference the Outbound Endpoint via the Id, so once again we’ll need to grab that first, then create and assign the ruleset.
$OutEndpointId = az dns-resolver outbound-endpoint list --resource-group Lab --dns-resolver-name Resolv1 --query [].[id] -o tsv

az dns-resolver forwarding-ruleset create `
	--resource-group Lab `
	--dns-forwarding-ruleset-name ConditionalForwarder1 `
	--outbound-endpoints id=$OutEndpointId

az dns-resolver forwarding-rule create `
	--resource-group Lab `
	--forwarding-rule-name internal-xkln-net `
	--ruleset-name ConditionalForwarder1 `
	--domain-name internal.xkln.net. `
	--forwarding-rule-state Enabled `
	--target-dns-servers ip-address="192.168.1.4" # This is the IP of our DC1 VM

az dns-resolver vnet-link create `
	--resource-group Lab `
	--name ConditionalForwarder1VnetLink1 `
	--ruleset-name ConditionalForwarder1 `
	--id $VNId
To summarise the above block, we first pulled the unique Id of our Outbound Endpoint, then we created a ruleset which is a container for forwarding rules. We then created the forwarding rule and assigned it to the ruleset, and finally we linked the ruleset to our VNet.
We should now be able to resolve hostnames in our “on-prem” environment from the “cloud” systems.
PS C:\> Resolve-DnsName dc1.internal.xkln.net

Name                                           Type   TTL   Section    IPAddress
----                                           ----   ---   -------    ---------
dc1.internal.xkln.net                          A      1800  Answer     10.11.12.13
Success!
That’s all for this one, while it’s not the most exciting topic it is important to understand the various DNS options within Azure as they underpin so many other services.