Deploying Azure Application Gateway - Part 1: Intro And Basic Deployment
Posted on June 13, 2022
- and tagged as
- azure,
- powershell
I’ve recently spend some time with Azure Application Gateway and wanted to put my notes in a format that can benefit others.
Part 1 will be an overview of Azure Application Gateway and walking through the process of creating very simple deployment using the Azure CLI.
Part 2 will cover a more realistic deployment where we provide end to end encryption and configure a few URL based routing rules and add custom headers.
The difference between Azure Application Gateway and Azure Load Balancer?
Azure Application Gateways is a HTTP/S load balancer where routing decisions are made based on URI paths or host headers in addition to the usual IP/Port combo.
Unlike the Azure Load Balancer which is a transparent Layer 4 service that uses dNAT to distribute load the Application Gateway terminates the connection (providing SSL offload) and then reverse proxies the connection to the backend systems.
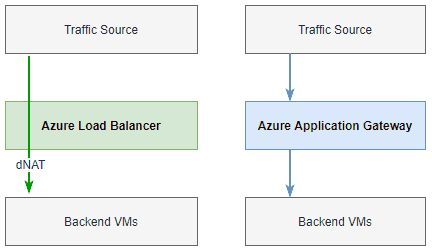
Additionally Azure Application Gateway can provide WAF (Web Application Firewall) capabilities to protect against SQL injection, XSS, and various other attacks.
Part 1 will be an overview of Azure Application Gateway and walking through the process of creating very simple deployment using the Azure CLI.
Part 2 will cover a more realistic deployment where we provide end to end encryption and configure a few URL based routing rules and add custom headers.
Concepts
This series of posts is going to be mostly practical in nature so we’re going to gloss over most of the theory but I do want to mention some key concepts.
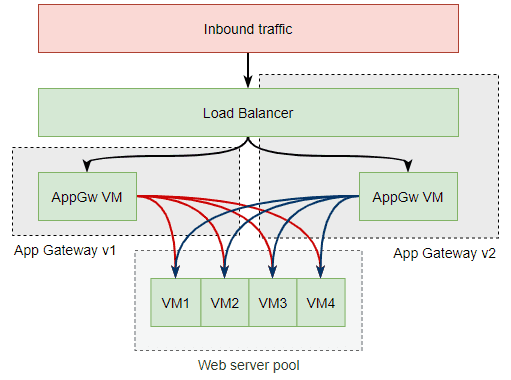
Azure Application Gateway V1 vs V2
There are two versions of Azure Application Gateway - v1 and v2. All posts in this series will be using v2 but let’s quickly cover some of the more important differences.
Under the hood the both v1 and v2 application gateways provide their services using VMs. That is, Azure spins up a number of VMs corresponding to the number of instances we specify or according to autoscaling rules. We don’t get access into these VMs and they never show up in the portal but they’re what is doing the actual work.
Load Balancing
With multiple VMs providing our application gateway services it means we need a way to load balance incoming requests across this VM pool - our load balancer needs a load balancer. With v1 we are responsible for providing this load balancer - either via a DNS or via the layer 4 Azure Load Balancer. With v2 an Azure Load Balancer is integrated into the solution so it’s not something we need to worry about.
Required meme:

Internal Only Application Gateways
Application gateways can be used as a frontend to internal (non internet facing) services, however, only v1 provides us the option to only configure our app gateway with a private address. V2 Application Gateways must have at least one public IP address assigned.
Other notable differences
The following features are only provided in v2:
- Autoscaling
- Zone redundancy
- HTTP/S header re-writing
There are many more differences and a list can be found in the official documentation.
Let’s move on to the main practical section - deploying Azure Application Gateway using Azure CLI.
Deploying Azure Application Gateway using Azure CLI - Simple Deployment
Whenever I’m learning something I like to begin with a minimalist deployment and build on from that. We’re going to be deploying the necessary network infrastructure (a VNet and subnets), two VMs to act as our backend web servers, and an Azure Application Gateway which is going to terminate and load balance all inbound HTTP requests over port 80.
For the simple deployment we’re completely ignoring SSL/TLS but let’s cover a few deployment options. As client connection terminates at the Application Gateway we have a few options for how to handle encryption.
We can:
- Accept inbound HTTP and connect to the backend via HTTP
- Accept inbound HTTP and connect to the backend via HTTPS
- Accept inbound HTTPS and connect to the backend via HTTP
- Accept inbound HTTPS and connect to the backend via HTTPS
Out of these only the third and fourth are recommended deployments. We should not be allowing HTTP between the client and the application gateway as this means all traffic traversing the public internet is unencrypted which allows it to be read as well as modified by anything in the path (i.e., to inject ads).
In Part 2 we’re going to configure a redirect from HTTP to HTTPS which is the ideal way to handle HTTP.
Allowing HTTP between the Application Gateway and our backend web servers isn’t as bad as the traffic is inside Microsoft’s private network but if we want to say we provide end to end encryption we need to encrypt this as well - another job for Part 2.
I promised this would be practical so let’s begin deploying some prerequisite objects.
Azure Application Gateway Prerequisites
Azure Application Gateway requires its own dedicated subnet and for v2 a /24 is the recommended size.
Let’s get deploying, we’re going to provision the VNet, Subnets, and two VMs to serve as our backend web servers as well as a subnet attached Network Security Group (NSG) to allow RDP access to our VMs. This is to allow us easy access to our lab and not a recommended production configuration.
$ResourceGroup = "lab"
$VNet = "labVNet"

# Create Resource Group
az group create --location australiaeast --name $ResourceGroup

# Create VNet and subnets
az network vnet create `
    --resource-group $ResourceGroup `
    --name $VNet `
    --address-prefixes 10.0.0.0/16

az network vnet subnet create `
    --resource-group $ResourceGroup `
    --vnet-name $VNet `
    --name WebServers `
    --address-prefixes 10.0.1.0/24

az network vnet subnet create `
    --resource-group $ResourceGroup `
    --vnet-name $VNet `
    --name AGW1Subnet `
    --address-prefixes 10.0.255.0/24

# Create WebServers Subnet NSG and rule allowing RDP (not suitable for production)
az network nsg create `
    --resource-group $ResourceGroup `
    --name WebServerNSG

az network nsg rule create `
	--resource-group $ResourceGroup `
	--nsg-name WebServerNSG `
	--name Allow-RDP-In --priority 110 `
	--access Allow --protocol Tcp `
    --direction Inbound `
	--source-address-prefix Internet `
    --source-port-range "*" `
	--destination-address-prefix "10.0.1.0/24" `
    --destination-port-range 3389

az network vnet subnet update `
	--resource-group $ResourceGroup `
	--vnet-name $VNet `
	--name WebServers `
	--network-security-group WebServerNSG

# Create web server VMs
"Web1", "Web2" | % {
    az vm create `
	--resource-group $ResourceGroup `
	--name $_ `
	--image Win2019Datacenter `
	--subnet WebServers `
	--vnet-name $VNet `
	--nsg '""' `
	--public-ip-sku Standard `
	--priority Spot `
	--eviction-policy Deallocate `
    --admin-username md `
	--admin-password ((Import-Clixml ~/winpw.xml) | ConvertFrom-SecureString -AsPlainText)
}
We’ve now got our network infrastructure deployed and two VMs spun up.
Let’s talk a bit about the NSG configuration. You’ll notice we’re not allowing in port 80 traffic from the internet. The default NSG configuration contains a rule allowing traffic sourced from AzureLoadBalancer which is what allows access from the Azure Application Gateway to our VMs. We do not want our web servers to be accessible directly from the Internet as this would allow the Application Gateway to be bypassed.
The above configuration will provision a public IPs for our VMs but this is not required - we’re doing it here purely for ease of access into the lab environment.
Next let’s configure IIS on our VMs.
IIS Configuration
We could do this manually but with just a few lines of PowerShell we can automate it and push it via the Azure CLI.
vmconfig-webserver.ps1
# Install IIS with ASP.Net support
Install-WindowsFeature -name Web-Server, Web-Asp-Net45 -IncludeManagementTools

# Create a default file containing WAN IP, ipconfig output, and a dump of request headers
$HTML = "<pre>" + $ENV:COMPUTERNAME + "<br/>"
$HTML += "WAN IP: $(irm ifconfig.me) <br/><hr/>"
$HTML += "Request headers: <br/>"
$HTML += '<%= Request.Headers.ToString().Replace("&","<br/>") %></pre>'
$HTML > C:\inetpub\wwwroot\default.aspx

# Create subfolders
"about", "blog" | % {
    New-Item -ItemType Directory -Path C:\inetpub\wwwroot\ -Name $_ | Out-Null

    $HTML = "<pre>/$_</pre>"
    $HTML += gc C:\inetpub\wwwroot\default.aspx -Raw
    $HTML > C:\inetpub\wwwroot\$_\default.aspx
}

# Remove default iisstart.htm file
Remove-Item "C:\inetpub\wwwroot\iisstart.htm"
We can then execute this on both VMs using the Azure CLI.
# Run deployment configs
"Web1", "Web2" | % {
	az vm run-command invoke `
        --resource-group $ResourceGroup `
        --command-id RunPowerShellScript `
        --scripts "@vmconfig-webserver.ps1" `
        --name $_
}
This is going to give us a simple webpage structure on each server which is going to output the server hostname, public IP, and the request headers. There are also about and blog subfolders but these will be used later in Part 2 so we can ignore them for now.
Here is the output we can expect.
We can now move to deploying the Azure Application Gateway.
Azure Application Gateway Deployment
Let’s begin with the Azure CLI commands to provision our application gateway and associated public IP.
# Create Public IP object
az network public-ip create `
	--resource-group $ResourceGroup `
	--sku Standard `
	--name AGW1IP1

# Create Azure Application Gateway
az network application-gateway create `
	--resource-group $ResourceGroup `
	--name AGW1 `
	--vnet-name $VNet `
	--subnet AGW1Subnet1 `
	--public-ip-address AGW1IP1 `
	--sku Standard_v2 `
    --capacity 2 `
	--frontend-port 80 `
    --http-settings-port 80 `
    --priority 1000 `
We could skip provisioning our own public IP and the Azure orchestration system would create one for us automatically but I prefer to be explicit about it.
Let’s take a closer look at some of the parameters we’ve specified.
The sku is Standard_v2. V2 offers the Standard_v2 SKU and the WAF_v2 SKU, with WAF_v2 supporting Web Application Firewall features. We’re not using those in this exercise so we can stick with the standard. The capacity parameter specifies how many instances of the application gateway we want Azure to provision - this is effectively telling Azure how many VMs we want it to deploy. Two would be the minimum I would ever configure. The frontend-port specifies what port we listen on for external connections, and the http-settings-port is the port the gateway uses to connect to our backend servers.
The priority parameter is required (despite the documentation stating it is optional) and it defines what priority the default rule which handles request processing will have (more on rules a bit later). Here is the error if we omit the priority parameter.
{
	"code": "ApplicationGatewayRequestRoutingRulePriorityCannotBeEmpty",
	"message": "Priority for the request routing rule /subscriptions/<subscription>/resourceGroups/lab/providers/Microsoft.Network/applicationGateways/AGW1/requestRoutingRules/rule1 cannot be empty. All request routing rules should have a priority defined starting from api-version 2021-08-01",
	"details": []
}
The full parameters for az network application-gateway create can be found here.
You’ll notice we haven’t referenced our backend servers anywhere in the above command so let’s add them in because our application gateway needs to know where to send requests.
Backend servers are added to Backend Pools which are collections of servers to which requests can be routed. When we provisioned our Application Gateway the Azure orchestration system deployed a default backend pool for us with the name appGatewayBackendPool. Servers can be added in various ways (IP, FQDN, VM Scale Set). We’re going to keep it simple and retrieve the web server internal IPs and assign them to the default pool.
$WebServerIPs = az vm list-ip-addresses --query "[].virtualMachine.network.privateIpAddresses[0]" -o tsv
az network application-gateway address-pool update `
--resource-group $ResourceGroup `
--gateway-name AGW1 `
--name appGatewayBackendPool `
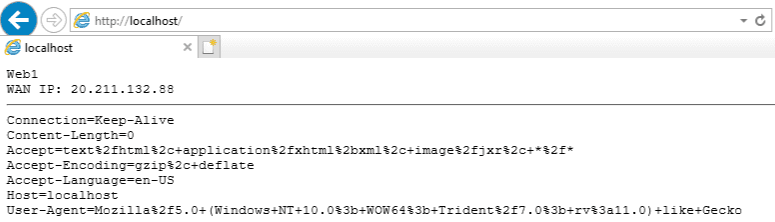
--servers $WebServerIPsAnd that’s it, our Azure Application Gateway has been deployed and is now operational over HTTP. If we retrieve the public IP and browse to it we can see the load balancing in action.
PS C:\> $IPid = az network application-gateway show -g $ResourceGroup --name AGW1 --query "frontendIpConfigurations[].publicIpAddress.id" -o tsv
PS C:\> az network public-ip show --id $IPid --query "ipAddress" -o tsv

20.5.116.134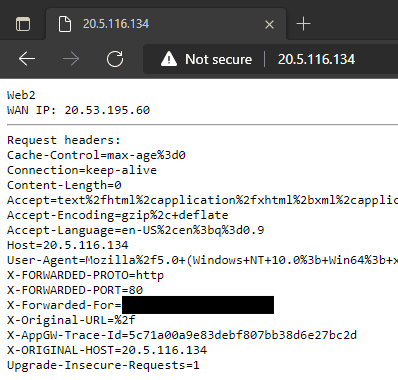
Thanks to our webpage content showing the server hostname we can see both backend servers are being utilized and the public IP of the VMs does not correspond to the IP of the Application Gateway. The original client IP is provided in the X-Forwarded-For header.
Because we didn’t enable the http-settings-cookie-based-affinity parameter our requests are going to be load balanced across both servers. With that parameter set to true the gateway sets a cookie that allows it to direct requests belonging to the same session to the same backend server.
Azure Application Gateway Components
Earlier I mentioned the default backend pool that the orchestration system created for us. This wasn’t the only object that got created, much like when a VM is provisioned Azure creates the disk, NIC, public IP, private IP configuration, NSG, etc.
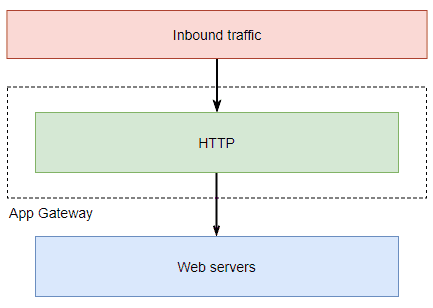
The very simple traffic flow diagram right at the top of this post actually looks something more like the diagram below when all components are accounted for.
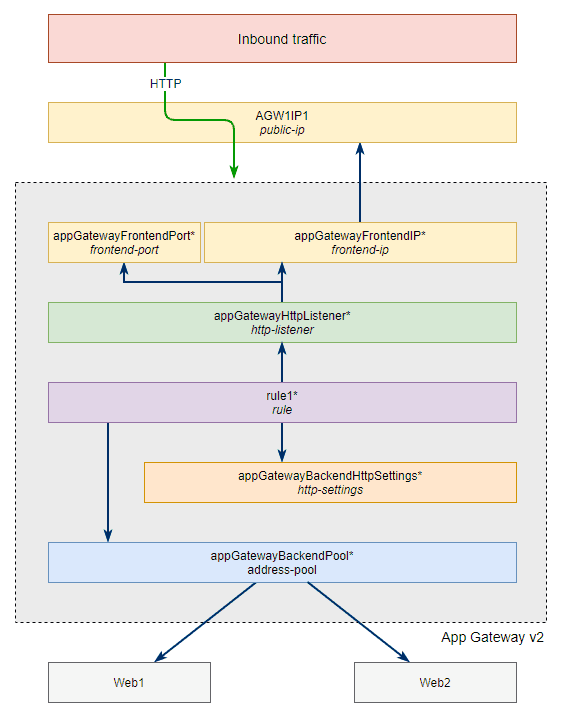
Before we move to Part 2 with a more complicated deployment it’s important to understand these components as we’re going to be building many of them to replace the defaults. All items on the diagram with an asterisk at the end of the name were default objects deployed during the creation of the Application Gateway.
The dark blue arrows in the diagram indicate which components reference which other components. For example, we can’t create a rule before having a listener because during the creation of the rule we need to specify which listener it is attached to.
Let’s briefly cover each object.
Frontend IP and Frontend Port
These refer to the public facing IP address and port that clients communicate with. The frontend port is not visible in the Azure portal but it is its own independent object, Azure just transparently creates it when you specify the port in the Listener configuration. We can however view them using the Azure CLI.
PS C:\> az network application-gateway frontend-port list -g $ResourceGroup --gateway-name AGW1- etag: W/"29e35e34-ab99-472a-894e-8970c7f39b0f"
id: /subscriptions/<subscription>/resourceGroups/lab/providers/Microsoft.Network/applicationGateways/AGW1/frontendPorts/appGatewayFrontendPort
name: appGatewayFrontendPort
port: 80
provisioningState: Succeeded
resourceGroup: lab
type: Microsoft.Network/applicationGateways/frontendPortsListener
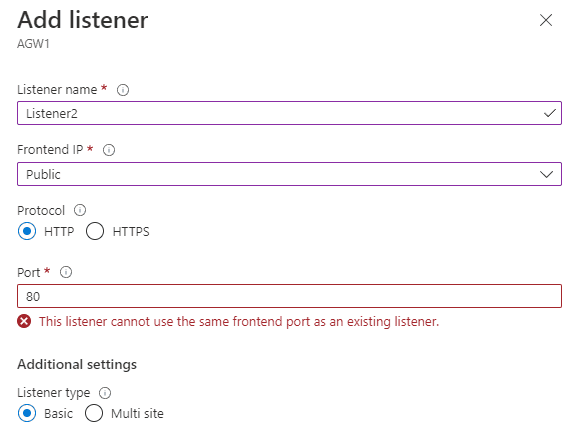
The listener is what listens for connection requests over a specific IP, port, protocol, and optionally host header. Listeners come in two flavours, Basic, which accepts all requests on a given IP, port, and protocol, and Multi Site which adds support for matching by host header. This is useful if you have multiple websites behind the same IP and port.
Here we see in the Azure Portal if we try to add another Basic listener on the same IP and Port as our default listener it cannot process the request.
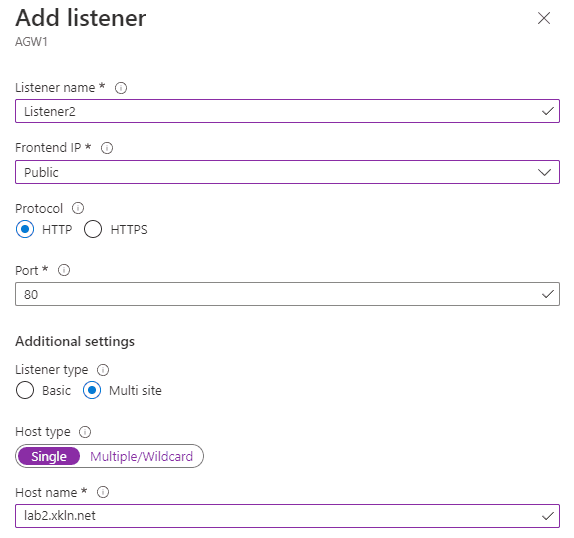
However, a multi site listener will work.
Rules
Rule are where the magic happens, they allow us to define where traffic gets proxied to (which backend pool), whether any rewrites need to be applied to request or responses headers or to the URL path and/or query string, or whether to redirect the traffic to an external domain or another listener.
Rules can be Basic where all paths for a given listener are sent to the same backend pool, or Path-based, where we can send different paths (/about, /blog, etc..) to different backend pools. We’ll be exploring this more in Part 2.
Backend HTTP Settings
These are settings which define how the Application Gateway connects to servers listed in our backend pool. Which protocol (HTTP or HTTPS and corresponding certificate configuration), which port, whether to enable cookie based affinity and connection draining, whether to override the HTTP host header, and how to check the health of the backend servers.
The backend pools provide the IPs to load balance the traffic to, the backend http settings define how to connect to them and other associated settings.
Here is a screenshot showing backend settings with HTTPS configured for the backend.

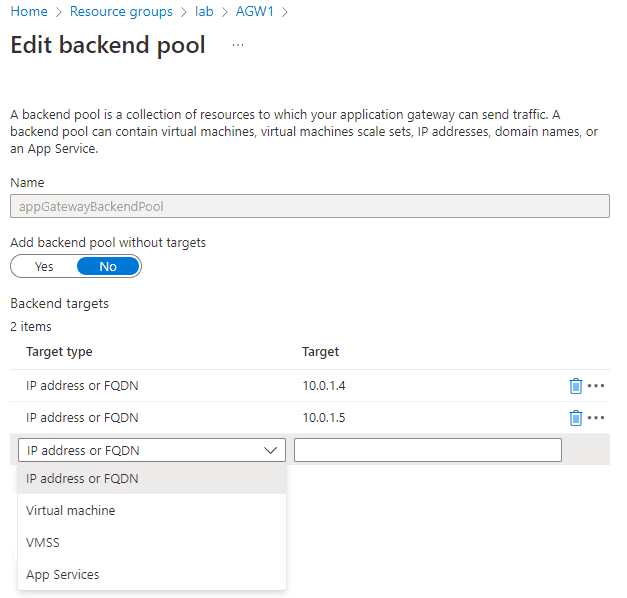
Backend Pools
We’ve already mentioned backend pools a few times so we know they’re a collection of backend servers we can direct our traffic to. Here is the backend pool for our simple deployment showing what types of targets we can add.
That’s all for Part 1, in Part 2 we’re going to configure end-to-end encryption and add some additional routing and header rewrite rules.