Deploying Azure Application Gateway - Part 2: End To End Encryption, Path Routing, And Header Rewriting
Posted on June 14, 2022
- and tagged as
- azure,
- powershell
In Part 1 we deployed a simple Application Gateway configuration and discussed the various components that make up the service. In Part 2 we’re going to configure a more realistic deployment by implementing end to end encryption as well as path based routing and HTTP header rewrites.
Let’s begin with our desired architecture.
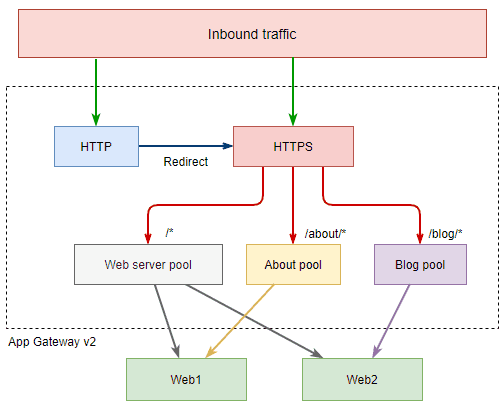
Here are the results we want to achieve:
- Inbound HTTP requests get redirected to HTTPS
- Set TLS 1.2 as the minimum protocol version between the user and the Azure Application Gateway
- Traffic between the Azure Application Gateway and backend web servers should be over HTTPS
- Addition of a custom HTTP request header
- Traffic to
/is load balanced across both Web Server VMs - Path based routing
- Traffic to
/about/*is sent only to Web1 - Traffic to
/blog/*is sent only to Web2 - Normally these would be different web servers entirely but this works well enough as a demonstration.
- Traffic to
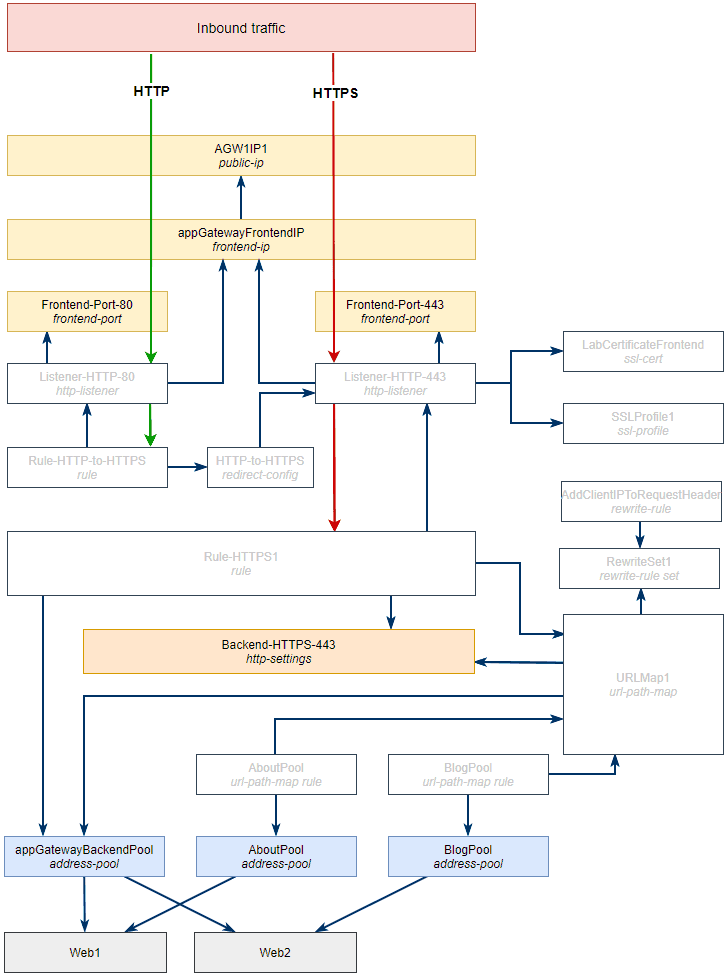
In the previous post we first went through the deployment steps and at the end posted the architecture diagram showing all of the underlying objects that were provisioned. We’re going to take the opposite approach here and begin with the diagram and then slowly build out the solution.
While the above diagram is a nice birds eye view of what we’re building, this here is the reality.

The dark blue lines show the relationship between objects - for example, in the configuration of the Rule-HTTP-to-HTTPS rule we need to reference the Listener-HTTP-80 listener and the HTTP-to-HTTPS redirect configuration objects so we want to have them both already created before we create the rule.
Let’s begin with some of the prerequisites - VNets, VMs, etc.
Azure Application Gateway Prerequisites
This is largely going to be the same as in Part 1. We’re going to provision a VNet, two subnets, and two VMs to be our backend web servers.
$ResourceGroup = "lab"
$VNet = "labVNet"

# Create Resource Group
az group create --location australiaeast --name $ResourceGroup

# Create VNet and subnets
az network vnet create `
    --resource-group $ResourceGroup `
    --name $VNet `
    --address-prefixes 10.0.0.0/16

az network vnet subnet create `
    --resource-group $ResourceGroup `
    --vnet-name $VNet `
    --name WebServers `
    --address-prefixes 10.0.1.0/24

az network vnet subnet create `
    --resource-group $ResourceGroup `
    --vnet-name $VNet `
    --name AGW1Subnet `
    --address-prefixes 10.0.255.0/24

# Create WebServers Subnet NSG and rule allowing RDP (not suitable for production)
az network nsg create `
    --resource-group $ResourceGroup `
    --name WebServerNSG

az network nsg rule create `
	--resource-group $ResourceGroup `
	--nsg-name WebServerNSG `
	--name Allow-RDP-In --priority 110 `
	--access Allow --protocol Tcp `
    --direction Inbound `
	--source-address-prefix Internet `
    --source-port-range "*" `
	--destination-address-prefix "10.0.1.0/24" `
    --destination-port-range 3389

az network vnet subnet update `
	--resource-group $ResourceGroup `
	--vnet-name $VNet `
	--name WebServers `
	--network-security-group WebServerNSG

# Create web server VMs
"Web1", "Web2" | % {
    az vm create `
	--resource-group $ResourceGroup `
	--name $_ `
	--image Win2019Datacenter `
	--subnet WebServers `
	--vnet-name $VNet `
	--nsg '""' `
	--public-ip-sku Standard `
	--priority Spot `
	--eviction-policy Deallocate `
    --admin-username md `
	--admin-password ((Import-Clixml ~/winpw.xml) | ConvertFrom-SecureString -AsPlainText)
}
Because we’re going to be implementing end to end encryption we’re going to deploy Azure Key Vault to store our certificate and have the VMs pull it from there. I’m using a Let’s Encrypt certificate I prepared earlier for lab.xkln.net. I previously wrote a short post on how to obtain these here.
# Create Key Vault
az keyvault create `
    --resource-group $ResourceGroup `
	--name Lab-KV-Pick-Your-Own-Unique-Name `
	--location australiaeast `
	--enabled-for-deployment true

# Import certificate
az keyvault certificate import `
	--vault-name Lab-KV-Pick-Your-Own-Unique-Name `
	--file "C:\temp\lab-certs\lab.xkln.net.pfx" `
	--password (Import-Clixml "C:\temp\lab-certs\lab.xkln.net.pfx.xml").GetNetworkCredential().Password `
	--name LabCertificate
Once the VMs are up and running and our certificate is deployed we need to import it into the VMs. The better way to do this is with the Key Vault virtual machine extension for Windows but we’re going for the quick and easy approach as certificate management isn’t the focus of the post.
"Web1", "Web2" | % {
    az vm secret add `
        --resource-group $ResourceGroup `
        --name $_ `
        --keyvault Lab-KV-Pick-Your-Own-Unique-Name `
        --certificate LabCertificate
}
We then need to update our vmconfig-webserver.ps1 file from Part 1 which will install and configure IIS, this time with HTTPS bindings. Due to the end to end encryption requirement we’re also going to remove the port 80 binding to ensure no traffic can hit the server unencrypted.
vmconfig-webserver.ps1
# Install IIS with ASP.Net support
Install-WindowsFeature -name Web-Server, Web-Asp-Net45 -IncludeManagementTools

# Create a default file containing WAN IP, ipconfig output, and a dump of request headers
$HTML = "<pre>" + $ENV:COMPUTERNAME + "<br/>"
$HTML += "WAN IP: $(irm ifconfig.me) <br/><hr/>"
$HTML += "Request headers: <br/>"
$HTML += '<%= Request.Headers.ToString().Replace("&","<br/>") %></pre>'
$HTML > C:\inetpub\wwwroot\default.aspx

# Create subfolders
"about", "blog" | % {
    New-Item -ItemType Directory -Path C:\inetpub\wwwroot\ -Name $_ | Out-Null

    $HTML = "<pre>/$_</pre>"
    $HTML += gc C:\inetpub\wwwroot\default.aspx -Raw
    $HTML > C:\inetpub\wwwroot\$_\default.aspx
}

# Remove default iisstart.htm file
Remove-Item "C:\inetpub\wwwroot\iisstart.htm"

# Configure IIS HTTPS binding using previously imported self signed certificate
$Cert = Get-ChildItem Cert:\LocalMachine\My\ | ? Subject -eq "CN=lab.xkln.net"
New-WebBinding -Name "Default Web Site" -Protocol https -Port 443
(Get-WebBinding -Name "Default Web Site" -Protocol https -Port 443).AddSslCertificate($Cert.Thumbprint, "my")

# Remove http binding
Remove-WebBinding -Protocol http -Port 80
And we invoke it on our two web servers.
# Run deployment configs
"Web1", "Web2" | % {
	az vm run-command invoke `
        --resource-group $ResourceGroup `
        --command-id RunPowerShellScript `
        --scripts "@vmconfig-webserver.ps1" `
        --name $_
}
That’s the prerequisites out of the way - only minor changes from the previous post. Let’s move onto the Application Gateway deployment.
Azure Application Gateway Deployment
As before we’re going to begin with provisioning a public IP object, and then the Application Gateway itself.
# Create Public IP object
az network public-ip create `
	--resource-group $ResourceGroup `
	--sku Standard `
	--name AGW1IP1

# Create Azure Application Gateway
az network application-gateway create `
    --resource-group $ResourceGroup `
    --name AGW1 `
    --vnet-name $VNet `
    --subnet AGW1Subnet `
    --public-ip-address AGW1IP1 `
    --capacity 2 `
    --sku Standard_v2 `
    --http-settings-port 80 `
    --frontend-port 8081 `
    --priority 10001

# Add web server VM IPs to default backend pool
$WebServerIPs = az vm list-ip-addresses --query "[].virtualMachine.network.privateIpAddresses[0]" -o tsv

az network application-gateway address-pool update `
    --resource-group $ResourceGroup `
    --gateway-name AGW1 `
    --name appGatewayBackendPool `
    --servers $WebServerIPs
There are a few minor differences here from Part 1. The frontend-port is 8081 instead of 80 and the default rule priority is higher. We’re going to be creating new backend http settings (using port 443), frontend ports, and rules so we want to make it easy to delete the defaults later on.
The last block adds our backend VM IPs to the default backend pool. We could create a new pool to have consistent naming but this is fine for a lab.
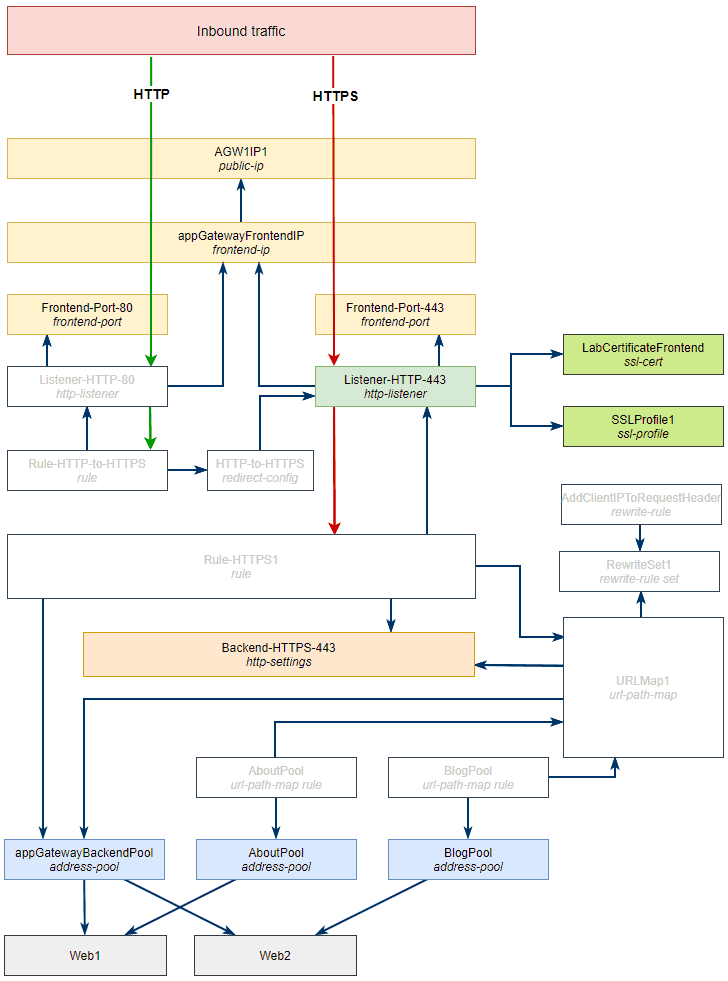
Let’s revisit our diagram and see what we’ve provisioned so far.

All of the objects with a white background still need to be created. Let’s get a few more object types we’re familiar with from Part 1 provisioned.
Frontend Ports
We’re going to create two frontend ports, one for port 80 and one for port 443.
# Create frontend port objects
80, 443 | % {
    az network application-gateway frontend-port create `
        --resource-group $ResourceGroup `
        --gateway-name AGW1 `
        --name Frontend-Port-$_ `
        --port $_
}
Backend Pools
Because we want to route traffic destined to /about/* and /blog/* to different servers we need to provision two backend pools to which we can direct the traffic.
# Creating backend pools
az network application-gateway address-pool create `
	--resource-group $ResourceGroup `
	--gateway-name AGW1 `
	--name AboutPool `
	--servers $WebServerIPs[0]

az network application-gateway address-pool create `
	--resource-group $ResourceGroup `
	--gateway-name AGW1 `
	--name BlogPool `
	--servers $WebServerIPs[1]
Here we’ve created our two pools and allocated one web server per pool.
Backend HTTP Settings
Before we review our progress let’s create the backend http settings object. This is going to differ from the default object created by the Azure orchestration system because we want to connect to our backend servers over HTTPS rather than HTTP.
# Create backend HTTP settings
az network application-gateway http-settings create `
	--resource-group $ResourceGroup `
	--gateway-name AGW1 `
	--port 443 `
	--name Backend-HTTPS-443 `
	--protocol Https `
	--host-name lab.xkln.net
The --host-name parameter is required to enable the default health probes to hit the backend servers using the correct host header. Without this the host header in the health probe request would contain the IP address of the server listed in the address pool chasing the certificate check to fail due to a name mismatch (10.0.1.X ≠ lab.xkln.net). This would in turn mark our servers as unhealthy and the Application Gateway would cease routing traffic to them resulting in a 502 Bad Gateway being sent back to the client.
Let’s take another look at our diagram.
We’re getting closer and can now move onto the more interesting objects.
Application Gateway Certificates, SSL Profiles, Listeners, and Backend Settings
Next on the list is to create our HTTPS listener, but to do this we need to first create the SSL profile and upload our frontend certificate. As the diagram shows the listener configuration references the SSL objects so those will be created first.
Application Gateway Frontend SSL Certificate
I’m using the same certificate for the frontend as I am for the backend. There are important considerations relating to this which I’ll cover towards the end but for now here is the Azure CLI snippet to upload our PFX to the Application Gateway.
# Import the frontend certificate
az network application-gateway ssl-cert create `
	--resource-group $ResourceGroup `
	--gateway-name AGW1 `
	--name LabCertificateFrontend `
	--cert-file "C:\temp\lab-certs\lab.xkln.net.pfx" `
	--cert-password (Import-Clixml "C:\temp\lab-certs\lab.xkln.net.pfx.xml").GetNetworkCredential().Password
Application Gateway SSL Profiles
SSL Profiles allow us to define rules relating to termination of HTTPS connections, things like the minimum SSL/TLS version and accepted ciphers.
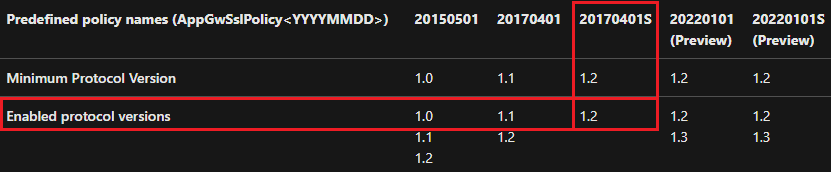
We can define a custom profile or we can use one of the presets provided by Azure - we’re going to be using the preset which specifies TLS 1.2 as the minimum TLS version.
# Create an SSL profile using a predefined policy
az network application-gateway ssl-profile add `
    --resource-group $ResourceGroup `
    --gateway-name AGW1 `
    --name SSLProfile1 `
    --policy-type Predefined `
    --policy-name AppGwSslPolicy20170401S
We can view the details of this policy both in the Azure Portal under the SSL Settings menu in the Application Gateway section or via the Azure CLI.
PS C:\> az network application-gateway ssl-policy predefined list --query "[?name=='AppGwSslPolicy20170401S']"

- cipherSuites:
  - TLS_ECDHE_ECDSA_WITH_AES_128_GCM_SHA256
  - TLS_ECDHE_ECDSA_WITH_AES_256_GCM_SHA384
  - TLS_ECDHE_ECDSA_WITH_AES_128_CBC_SHA
  - TLS_ECDHE_ECDSA_WITH_AES_256_CBC_SHA
  - TLS_ECDHE_ECDSA_WITH_AES_128_CBC_SHA256
  - TLS_ECDHE_ECDSA_WITH_AES_256_CBC_SHA384
  - TLS_ECDHE_RSA_WITH_AES_256_GCM_SHA384
  - TLS_ECDHE_RSA_WITH_AES_128_GCM_SHA256
  - TLS_ECDHE_RSA_WITH_AES_128_CBC_SHA
  - TLS_ECDHE_RSA_WITH_AES_256_CBC_SHA
  - TLS_RSA_WITH_AES_256_GCM_SHA384
  - TLS_RSA_WITH_AES_128_GCM_SHA256
  - TLS_RSA_WITH_AES_256_CBC_SHA256
  - TLS_RSA_WITH_AES_128_CBC_SHA256
  - TLS_RSA_WITH_AES_256_CBC_SHA
  - TLS_RSA_WITH_AES_128_CBC_SHA
  id: /subscriptions/<guid>/resourceGroups//providers/Microsoft.Network/ApplicationGatewayAvailableSslOptions/default/ApplicationGatewaySslPredefinedPolicy/AppGwSslPolicy20170401S
  minProtocolVersion: TLSv1_2
  name: AppGwSslPolicy20170401S
  resourceGroup: ''
  type: Microsoft.Network/ApplicationGatewayAvailableSslOptions/ApplicationGatewaySslPredefinedPolicy
SSL Profiles are applied to the listener, they only dictate the TLS configuration between the client and the Azure Application Gateway.
Connections between the Application Gateway and backend servers have a minimum protocol version of TLS 1.0 and up to TLS 1.2. This means it’s up to us to configure our backend servers to only accept TLS 1.2 if that is a requirement.
Application Gateway HTTP Listener
We can now create our port 443 HTTP listener which is going to reference both the frontend certificate and the SSL profile. The SSL profile needs to be referenced by the id rather than the name so we need to retrieve that first.
# Obtain the SSL profile Id
$SSLProfileId = az network application-gateway ssl-profile list `
    --resource-group $ResourceGroup `
    --gateway-name AGW1 `
    --query "[?name=='SSLProfile1'].id" `
    -o tsv

# Create the HTTP listener
az network application-gateway http-listener create `
    --resource-group $ResourceGroup `
    --gateway-name AGW1 `
    --name Listener-HTTPS-443 `
    --frontend-port frontend-Port-443 `
    --frontend-ip appGatewayFrontendIP `
    --ssl-cert LabCertificateFrontend `
    --ssl-profile-id $SSLProfileId
Let’s take a moment to review our progress before starting on the rules and header rewrites.
Application Gateway Path Based Routing and Header Rewrites
In this section we’re going to be creating the the rules that dictate traffic flow within our web application. To recap, we want:
- Traffic to
/about/*and/blog/*to go to their respective pools - All other traffic to go to the default backend pool
- A new HTTP header to be included in the request to our backend servers containing the original client IP. This is already provided in the
X-Forwarded-Forheader but it makes for an easily verifiable example so we’re sticking with it.
Let’s begin with the additional header. The Application Gateway provides many options for when header (or URL path/query string) rewrites are applied allowing conditional rewrites to be created, however, we’re going to be keeping things simple and apply the new header to all inbound requests.
We first need to create a rewrite-rule set which can be thought of a container for rewrite rules and then we need to create our rule and assign it to the set.
# Create rewrite rule set
az network application-gateway rewrite-rule set create `
    --resource-group $ResourceGroup `
    --gateway-name AGW1 `
    --name RewriteSet1

# Create rewrite rule
az network application-gateway rewrite-rule create `
    --resource-group $ResourceGroup `
    --gateway-name AGW1 `
    --rule-set-name RewriteSet1 `
    --name AddClientIPToRequestHeader `
    --sequence 100 `
    --request-headers "ClientIP={var_client_ip}"
The name of the new header will be ClientIP and you’ll notice the syntax of the value assigned to it. A list of supported header server variables can be found here. It is also available from the Azure CLI.
PS C:\> az network application-gateway rewrite-rule condition list-server-variables

- request_query
- client_ip
- client_port
- client_user
- http_method
- request_uri
- http_version
- ciphers_used
- ssl_connection_protocol
- http_status
- request_scheme
- sent_bytes
- server_name
- server_port
- ciphers_supported
- client_tcp_rtt
- content_length
- content_type
- host
- ssl_enabled
- add_x_forwarded_for_proxy
- query_string
- received_bytes
- uri_path
- client_certificate
- client_certificate_fingerprint
- client_certificate_serial
- client_certificate_subject
- client_certificate_issuer
- client_certificate_start_date
- client_certificate_end_date
- client_certificate_verification
To assign any of these wrap them in curly brackets and prefix with var - {var_variablename}.
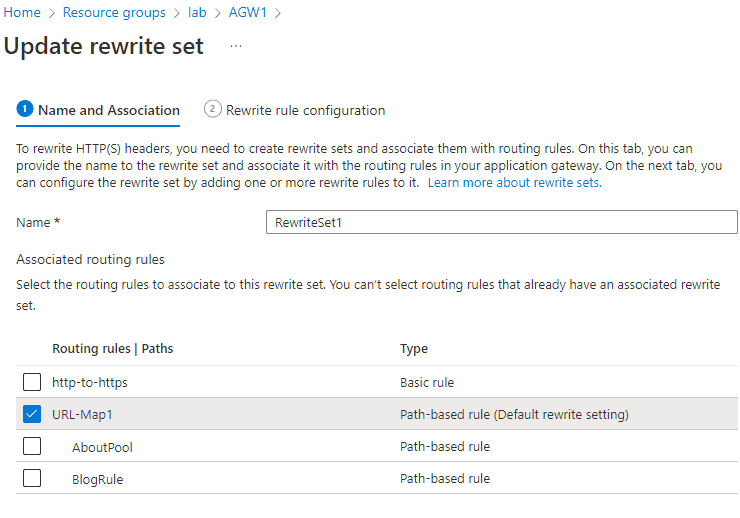
Next we’re going to create the URL Path Map and the associated rules to direct /about and /blog traffic. The URL Path Map can also be thought of as container for rules with a few important differences. Firstly, when creating the URL Path Map a Path Map Rule is created along with it - that is, the syntax for creating the path map also includes required parameters which define the first rule. We’re going to be defining the routing for the /about/* path in this initial rule and then we’re going to add a second rule for /blog/*.
Secondly, the URL Path Map will also point to the rewrite rule set. This whole URL Path Map bundle will then be assigned to the rule linked to our listener. Refer back to the diagram to better understand the relationships between these objects.
# Create URL Path Map and rule for /about/* path routing
az network application-gateway url-path-map create `
	--resource-group $ResourceGroup `
	--gateway-name AGW1 `
	--rule-name AboutPool `
	--default-address-pool appGatewayBackendPool `
	--default-rewrite-rule-set RewriteSet1 `
	--name URLMap1 `
	--paths /about/* `
	--address-pool AboutPool `
	--http-settings Backend-HTTPS-443

# Create rule for /blog/* path routing
az network application-gateway url-path-map rule create `
	--resource-group $ResourceGroup `
	--gateway-name AGW1 `
	--path-map-name URLMap1 `
	--name BlogRule `
	--paths /blog/* `
	--address-pool BlogPool
Lastly we need to create the rule which is going to tie everything together - the listener, the URL Path Map and associated rules and the backend HTTP settings.
# Create Application Gateway HTTPS Listener rule
az network application-gateway rule create `
	--resource-group $ResourceGroup `
	--gateway-name AGW1 `
	--name https1 `
	--http-listener Listener-HTTPS-443 `
	--rule-type PathBasedRouting `
	--address-pool appGatewayBackendPool `
	--http-settings Backend-HTTPS-443 `
	--url-path-map URLMap1 `
	--priority 1001
With this last piece in place we should finally have working end to end HTTPS traffic flow. Our architecture diagram now looks as follows.

Let’s get the HTTP to HTTPS redirect done and then we can progress to cleaning up unneeded default object and verifying everything works as expected.
Application Gateway HTTP to HTTPS Redirect
The configuration for this is straight forward: we create the HTTP listener for port 80, then we create a redirect config which points to our HTTPS listener. Alternatively we could redirect to the HTTPS URL but I prefer referencing the listener object as it means fewer changes should our domain change in the future. Lastly we create a rule that binds the listener to the redirect config.
# Create http port 80 listener
az network application-gateway http-listener create `
    --resource-group $ResourceGroup `
    --gateway-name AGW1 `
    --name Listener-HTTP-80 `
    --frontend-port frontend-Port-80 `
    --frontend-ip appGatewayFrontendIP

# Create redirect configuration for http to https
az network application-gateway redirect-config create `
	--resource-group $ResourceGroup `
	--gateway-name AGW1 `
	--name HTTP-to-HTTPS `
	--type Permanent `
	--include-path true `
	--include-query-string true `
	--target-listener Listener-HTTPS-443

# Create rule
az network application-gateway rule create `
	--resource-group $ResourceGroup `
	--gateway-name AGW1 `
	--name http-to-https `
	--http-listener Listener-HTTP-80 `
	--rule-type Basic `
	--priority 1000 `
	--redirect-config HTTP-to-HTTPS
That’s it - all objects on our diagram have been created and configured.

Default Object Cleanup
Let’s remove the default objects which we’re not using that were automatically provisioned when we created the Application Gateway.
# Delete default rule
az network application-gateway rule delete --resource-group $ResourceGroup --gateway-name AGW1 --name rule1

# Delete default listener
az network application-gateway http-listener delete --resource-group $ResourceGroup --gateway-name AGW1 --name appGatewayHttpListener

# Delete default frontend port
az network application-gateway frontend-port delete --resource-group $ResourceGroup --gateway-name AGW1 --name appGatewayFrontendPort

# Delete default HTTP backend settings
az network application-gateway http-settings delete --resource-group $ResourceGroup --gateway-name AGW1 --name appGatewayBackendHttpSettings
Time to test our deployment and ensure everything works as expected.
DNS Changes
To ensure our frontend certificates are working correctly we need to create a DNS A record for our website to the frontend IP which we can get using the following Azure CLI commands.
# Get Azure Application Gateway Public IP" -ForegroundColor Yellow
$IPId = az network application-gateway show `
    --resource-group $ResourceGroup `
    --name AGW1 `
    --query "frontendIpConfigurations[].publicIpAddress.id" `
    -o tsv

az network public-ip show --id $IPId --query "ipAddress" -o tsv
Testing
Verifying Application Gateway Load Balancing
Let’s verify our configuration works as expected.
We can see the browser is showing a secure connection with the traffic to / being load balanced across Web1 and Web2. We can also see the ClientIP header has the matching last octet as the X-Forwarded-For header.
Next, let’s check our URL path routing does what we wanted it to.
Verifying Application Gateway Load URL Path Routing
Unlike the first test, the web server hostname in the output does not change so we’ve successfully routed our paths to their respective backend pools. You’ll also notice the ClientIP header is missing - by default a rewrite rule does not propagate down.
Let’s confirm that our HTTP to HTTPS redirect works.
Verifying Application Gateway HTTP to HTTPS Redirection
I’ve confirmed it works in the browser but another way to check is with PowerShell.
PS C:\> (Invoke-WebRequest -Uri http://lab.xkln.net/ -MaximumRedirection 0 -ErrorAction SilentlyContinue).RawContent

HTTP/1.1 301 Moved Permanently   # <---------
Connection: keep-alive
Content-Length: 195
Content-Type: text/html
Date: Wed, 15 Jun 2022 11:57:39 GMT
Location: https://lab.xkln.net/  # <---------
Server: Microsoft-Azure-Application-Gateway/v2
Next let’s confirm the SSL Profile and SSL policy are being applied correctly.
Verifying Application Gateway SSL Policy
Our listener requires a minimum TLS version of 1.2. SSL Labs provides a great free service to audit the TLS configuration on web servers. Let’s see the results.
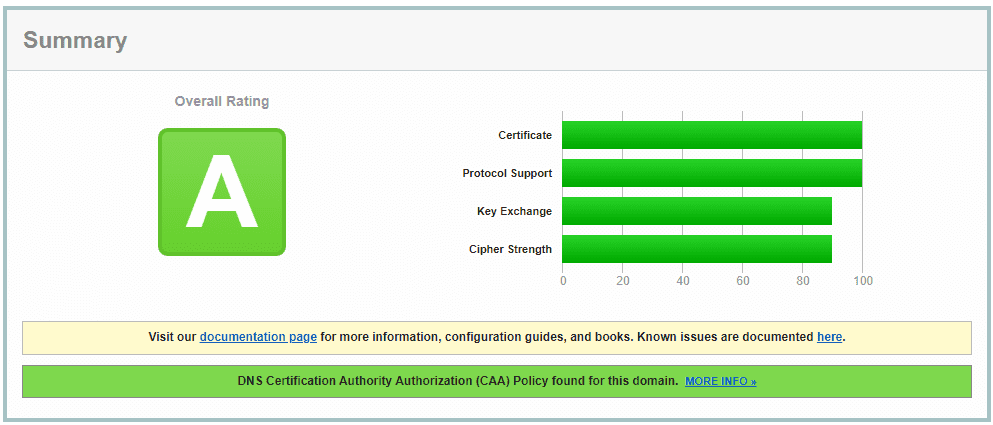
Looks like using a more modern and stricter profile has resulted in getting a good score, however, potentially at the cost of older clients being unable to connect.
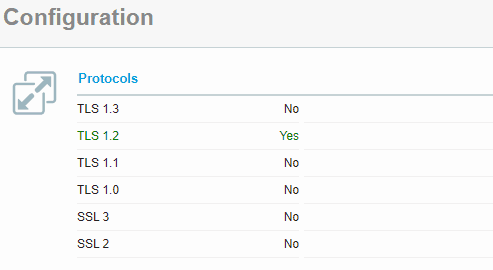
If you expected TLS 1.3 to be supported as well you’re not the only only. At the time of writing TLS 1.3 is only in preview and not available under our predefined policy. The corresponding Microsoft documentation can be found here but may be updated by the time you’re reading this.
Using Different Certificates Or Host Headers Between The Frontend And Backend
Earlier in the piece I mentioned using the same certificate for the frontend and backend which may have raised the question whether you could or should use different certificates and host headers between the two. For example we could stick with lab.xkln.net for the frontend, this is what our website visitors would type into the browser, but we could use something like internal.xkln.net for our backend systems. This can be achieved by updating the Host name field in the Backend settings.
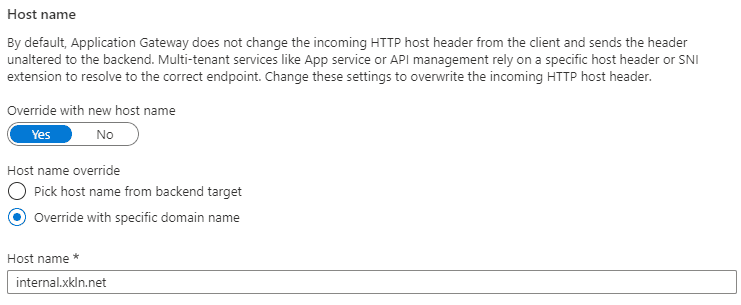
While this is a valid configuration (meaning Azure will accept it) it will cause problems as any redirects generated by IIS on our backend servers are going reference the internal.xkln.net name.
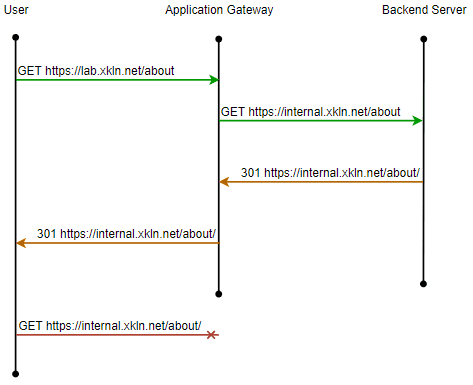
Say we browse to https://lab.xkln.net/about (notice the lack of / at the end). This request will reach the backend web server which will send a 301 redirect to https://lab.xkln.net/about/. However, if we’re using internal.xkln.net for the backend the web server will have no knowledge of lab.xkln.net and the redirect will be sent with the location of https://internal.xkln.net/about/. Our browser will then attempt to connect to that resource which will most likely end with a DNS lookup failure.
We can see this process with PowerShell. I’ve made the necessary changes to use internal.xkln.net, let’s see what happens when we make a request.
PS C:\> (Invoke-WebRequest -UseBasicParsing "https://lab.xkln.net/about" -MaximumRedirection 0 -ErrorAction SilentlyContinue).RawContent

HTTP/1.1 301 Moved Permanently    # <---------
Connection: keep-alive
Content-Length: 150
Content-Type: text/html; charset=UTF-8
Date: Wed, 15 Jun 2022 13:24:28 GMT
Location: https://internal.xkln.net/about/    # <---------
Server: Microsoft-IIS/10.0
X-Powered-By: ASP.NET
The logs on our web servers confirm that this request is making it to IIS and that a 301 Redirect is being returned.
GET /about - 443 - 10.0.255.6 Mozilla/5.0+(Windows+NT;+Windows+NT+10.0;+en-AU)+WindowsPowerShell/5.1.19041.1682 - 301 0 0 1There is a comprehensive document on other issues that can be caused by using such a configuration and it’s worth reading.
With that Part 2 comes to an end. I hope this series has been useful in giving you a good understating of how to build Azure Application Gateway deployments.