Getting Started With Terraform And The Active Directory Provider
Posted on August 07, 2020
- and tagged as
- terraform
A couple of days ago HashiCorp announced their Active Directory provider for Terraform. Having used Terraform in the past this immediately piqued my interest and this post will be an exploration of what the provider can do. One of the things I’m excited about is the ability to manage GPOs, so we’ll definitely be digging into that.
Before we begin, this provider is still experimental, and in HashiCorp’s own words: it is not yet mature enough to be used to manage production infrastructure.
Let’s get on with it.
Introduction to Terraform
What is Terraform?
Terraform is an infrastructure as code provisioning tool.
But what does that actually mean? In short, you write a description of what you want your environment to look like using HCL (HashiCorp Configuration Language), feed it to Terraform, and Terraform turns it into reality.
If you have a project in AWS that requires a VPC, two subnets, 3 EC2 instances, security groups, and an S3 bucket. You write the configuration that describes those components (which AMI, which EC2 type, what IP range for the subnets, so on and so forth), give it to Terraform to apply, and it generates the desired environment.
Terraform also keeps track of the environment, so if you run it again with no changes to the configuration, it compares the environment it previously built with the configuration, and determines that nothing needs to change. If you make a change, for example, you edit the rules of one of the security groups, Terraform knows which piece is missing and makes the appropriate changes.
What are Terraform Providers?
Providers are the plugins that Terraform uses to understand how to interact with a given service. In this post that service will be Active Directory, but there are providers for AWS, Azure, VMWare, etc. A list of providers can be found here. There are providers which are maintained by HashiCorp, as well as community built providers.
How do I install it?
Terraform is a single executable. You download it from the downloads page and stick is somewhere in your PATH. Providers are automatically downloaded by Terraform as needed.
PS C:\> terraform.exe --version
Terraform v0.12.29
Alright, let’s move on and start exploring the Active Directory provider.
Terraform Active Directory Provider Requirements
In addition to Terraform itself, we’re going to need an AD Domain Controller running Server 2012 R2 or newer, with WinRM enabled for Basic Authentication (more on this later).
Getting started with Terraform
We previously mentioned writing a configuration and passing it to terraform. Let’s create a configuration file now.
Create a folder on your system and inside it a file called ad.tf. The first thing we need to do is tell Terraform that it needs to use the Active Directory provider. This is done using the provider block within our ad.tf configuration file.
provider "ad" {
  version = "0.1.0"
}
We now need to initialize our project by running terraform init from the folder with our ad.tf configuration file. Terraform will parse all .tf files and will download the appropriate provider plugin(s).
PS C:\TF> terraform init

Initializing the backend...

Initializing provider plugins...
- Checking for available provider plugins...
- Downloading plugin for provider "ad" (hashicorp/ad) 0.1.0...

Terraform has been successfully initialized!

<truncated>
Once initialization is complete you’ll notice a .terraform folder in your directory that contains the provider.
C:\TF
│ - ad.tf
└──.terraform
    └──plugins
        └──windows_amd64
             - lock.json
             - terraform-provider-ad_v0.1.0_x5.exe
Setting Environment Variables
The AD Provider expects environment variables that will provide it with the hostname/IP of a Domain Controller, an administrative username, and a password. These are named as follows:
AD_HOSTNAMEAD_USERAD_PASSWORD
There are also optional variables we can set:
AD_WINRM_INSECURE: Trusts unknown WinRM certificates.- Default is false
AD_PORT: WinRM Port- Default is 5985
AD_PROTO: WinRM protocol (HTTPS or HTTPS)- Default is HTTP
Windows gives us two options when setting environment variables, we can have them only apply to the current PowerShell session, or we can have them persist.
As we’re storing administrative credentials, we’re going to go with the ephemeral option. This is good approach is it allows us to later leverage secret management systems like HashiCorp Vault or Azure Key Vault.
Let’s set these variables in our PowerShell prompt.
$env:AD_HOSTNAME="DomainControllerHostnameOrIP"
$env:AD_USER="AdminAccountUsername"
$env:AD_PASSWORD="AdminAccountPassword"
If you’re feeling brave and want them to persist as it’s perhaps a lab system, you can use the following instead:
setx AD_HOSTNAME "DomainControllerHostname"
setx AD_USER "AdminAccountUsername"
setx AD_PASSWORD "AdminAccountPassword"
If you go down the path of persistent vars, you’ll need to open a new PowerShell window so they can be pulled into the session.
Creating an OU using Terraform
Let’s move onto something practical, creating an OU in our AD environment. There are two steps required for Terraform to create our OU:
- Creating the configuration which instructs terraform on what to build
- Applying the configuration
Creating the configuration
With much of the boilerplate out of the way, lets write our first HCL block to create an OU. We’re going to be appending this to our previous ad.tf configuration file.
resource "ad_ou" "tf" {
    name = "Terraform"
    path = "dc=xkln,dc=local"
    description = "Terraform Objects"
    protected = false
}
As this is our first real declarative block that will create objects on our DC, lets briefly skim over the syntax. The first line tells terraform what type of code block this is (previously it was a provider block, now it’s a resource block), and the two strings which follow are the labels associated with that particular type.
If we look at the documentation for the resource type we can see that it expects two labels.
- The resource type (
ad_ou), and - A name (
tf)
The name defined here is not the name of the OU, but rather a local name that we can use inside our terraform configuration to reference this particular object elsewhere. Think of it as a variable name.
The resource types will be defined by what the Terraform provider supports. These are documented in the Terraform AD Provider documentation.
Inside our resource block, we define several properties
- The name we wish to give the OU
- The DN path where the OU should be created
- The description of the OU
- Whether the ‘Protect from accidental deletion’ flag is set
As before, each resource has the available properties documented.
To summarize, if we look at the HCL bloc, we want to create an OU called “Terraform Objects” at the root of our domain, give it a description, and we don’t want the accidental deletion protection flag to be set.
But how do we know what terraform is actually going to do? Perhaps we’ve made a mistake that’s going to cause problems. To see what Terraform would do we need to run terraform plan from our directory containing the configuration.
PS C:\TF> terraform plan

------------------------------------------------------------------------

An execution plan has been generated and is shown below.
Resource actions are indicated with the following symbols:
  + create

Terraform will perform the following actions:

  # ad_ou.tf_ou will be created
  + resource "ad_ou" "tf" {
      + description = "Terraform Objects"
      + dn          = (known after apply)
      + guid        = (known after apply)
      + id          = (known after apply)
      + name        = "Terraform"
      + path        = "dc=xkln,dc=local"
      + protected   = false
    }

Plan: 1 to add, 0 to change, 0 to destroy.

------------------------------------------------------------------------
Excellent, Terraform has informed us that intends to create 1 OU object, change none, and delete none.
There is an important thing to note here, terraform hasn’t yet connected to our server. It hasn’t logged in to check whether an OU with the same name already exists, whether the DN is correct, or anything else. It is comparing its empty cached state to what we have asked it to do.
Once we apply our configuration, terraform will create a state file that it will use (in addition to checking the actual server) to compare the live configuration to the terraform configuration file we’ve written, and the difference will determine what actions terraform needs to take.
Let’s now apply our configuration.
Running Terraform Apply
Configurations are applied using terraform apply, as follows:
terraform apply
<Truncated>

Error: powershell command failed with exit code 1
stdout:
stderr:

  on ad.tf line 5, in resource "ad_ou" "tf":
   5: resource "ad_ou" "tf" {
What happened? Despite what the unhelpful output may suggest, this is most likely the result of not having WinRM Basic Authentication enabled as it is disabled by default.
One thing to be aware of at this early stage of the AD provider development is that error messages will be less than stellar.
Enabling Basic Authentication for WinRM
We need to make changes on both the client and server to enable Basic authentication.
We can use the winrm get winrm/config to check the current configuration.
On the client side, we need to ensure that Config/Client/AllowUnencrypted is true, and on the server side we need to ensure both Config/Service/AllowUnencrypted and Config/Service/Auth/Basic are true.
We can enable Basic Authentication with these commands:
- Client
winrm set winrm/config/client '@{AllowUnencrypted="true"}'
- Server
winrm set winrm/config/service '@{AllowUnencrypted="true"}'winrm set winrm/config/service/auth '@{Basic="true"}'
What are the security implications of WinRM Basic Authentication?
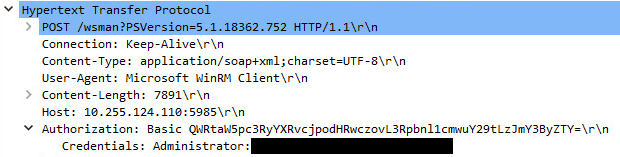
Allowing Basic (Unencrypted) WinRM authentication means our credentials are sent in cleartext, and by default WinRM operates over HTTP. A Wireshark packet capture of a WinRM connection attempt with Basic authentication shows that our credentials are clearly visible.
This is possibly ok for a lab, but for production we’re going to want to configure WinRM over HTTPS. That process is a outside the scope of this post, but there are plenty of guides online.
Applying the configuration
After that last bit of setup, let’s try our terraform apply again.
PS C:\TF> terraform apply

An execution plan has been generated and is shown below.
Resource actions are indicated with the following symbols:
  + create

Terraform will perform the following actions:

  # ad_ou.tf will be created
  + resource "ad_ou" "tf" {
      + description = "Terraform Objects"
      + dn          = (known after apply)
      + guid        = (known after apply)
      + id          = (known after apply)
      + name        = "Terraform"
      + path        = "dc=xkln,dc=local"
      + protected   = false
    }

Plan: 1 to add, 0 to change, 0 to destroy.

Do you want to perform these actions?
  Terraform will perform the actions described above.
  Only 'yes' will be accepted to approve.

  Enter a value: yes

ad_ou.tf: Creating...
ad_ou.tf: Creation complete after 5s [id=9e860006-11a8-4850-ac97-f089415b090a]

Apply complete! Resources: 1 added, 0 changed, 0 destroyed.
Looks good! Let’s check the server.
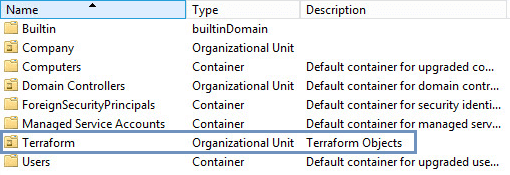
And our new OU is there!
Terraform State
Now that we’ve created an object on our server Terraform has stored the ‘state’ locally in a JSON file called terraform.tfstate.
C:\TF
│ - ad.tf
│ - terraform.tfstate
│ - terraform.tfstate.backup
└──.terraform
    └──plugins
        └──windows_amd64
            - lock.json
            - terraform-provider-ad_v0.1.0_x5.exe
Let’s have a look at the contents of that file:
{
  "version": 4,
  "terraform_version": "0.12.29",
  "serial": 3,
  "lineage": "2371eb4c-f9d8-c2a5-7db7-4a5018d32f23",
  "outputs": {},
  "resources": [
    {
      "mode": "managed",
      "type": "ad_ou",
      "name": "tf",
      "provider": "provider.ad",
      "instances": [
        {
          "schema_version": 0,
          "attributes": {
            "description": "Terraform Objects",
            "dn": "OU=Terraform,DC=xkln,DC=local",
            "guid": "cd03b28d-97e0-4286-b791-c7c6196ad821",
            "id": "cd03b28d-97e0-4286-b791-c7c6196ad821",
            "name": "Terraform",
            "path": "DC=xkln,DC=local",
            "protected": false
          },
          "private": "bnVsbA=="
        }
      ]
    }
  ]
}
We can see our OU inside the resources array, along with the GUID. These ID’s are what terraform uses to track the object, so renaming it manually on the server should cause Terraform to update the name to what we have in our configuration.
This is how terraform handles configuration drift. Let’s give it a test.
I’ve renamed the OU to WrongName, and re-ran terraform plan:
PS C:\TF> terraform plan
Refreshing Terraform state in-memory prior to plan...
The refreshed state will be used to calculate this plan, but will not be
persisted to local or remote state storage.

ad_ou.tf: Refreshing state... [id=cd03b28d-97e0-4286-b791-c7c6196ad821]

------------------------------------------------------------------------

An execution plan has been generated and is shown below.
Resource actions are indicated with the following symbols:
  ~ update in-place

Terraform will perform the following actions:

  # ad_ou.tf will be updated in-place
  ~ resource "ad_ou" "tf" {
        description = "Terraform Objects"
        dn          = "OU=WrongName,DC=xkln,DC=local"
        guid        = "cd03b28d-97e0-4286-b791-c7c6196ad821"
        id          = "cd03b28d-97e0-4286-b791-c7c6196ad821"
      ~ name        = "WrongName" -> "Terraform"
        path        = "DC=xkln,DC=local"
        protected   = false
    }

Plan: 0 to add, 1 to change, 0 to destroy.
We can see there are no additions, and a single change, WrongName to Terraform. Deleting the OU will cause Terraform to re-create it. If there is an existing OU already called Terraform, which isn’t in our state (i.e., it wasn’t created by Terraform), it will attempt to create the OU, but will throw an error. Let’s have a look at that error:
ad_ou.tf: Creating...

Error: Get-ADOrganizationalUnit exited with a non-zero exit code 1, stderr :#< CLIXML
<Objs Version="1.1.0.1" xmlns="http://schemas.microsoft.com/powershell/2004/04"><Obj S="progress" RefId="0"><TN RefId="0"><T>System.Management.Automation.PSCustomObject</T><T>System.Object</T></TN><MS><I64 N="SourceId">1</I64><PR N="Record"><AV>Loading Active Directory module for Windows PowerShell with default drive 'AD:'</AV><AI>0</AI><Nil /><PI>-1</PI><PC>0</PC><T>Processing</T><SR>-1</SR><SD> </SD></PR></MS></Obj><Obj S="progress" RefId="1"><TNRef RefId="0" /><MS><I64 N="SourceId">1</I64><PR N="Record"><AV>Loading Active Directory module for Windows PowerShell with default drive 'AD:'</AV><AI>0</AI><Nil /><PI>-1</PI><PC>25</PC><T>Processing</T><SR>-1</SR><SD> </SD></PR></MS></Obj><Obj S="progress" RefId="2"><TNRef RefId="0" /><MS><I64 N="SourceId">1</I64><PR N="Record"><AV>Loading Active Directory module for Windows PowerShell with default drive 'AD:'</AV><AI>0</AI><Nil /><PI>-1</PI><PC>50</PC><T>Processing</T><SR>-1</SR><SD> </SD></PR></MS></Obj><Obj S="progress" RefId="3"><TNRef RefId="0" /><MS><I64 N="SourceId">1</I64><PR N="Record"><AV>Loading Active Directory module for Windows PowerShell with default drive 'AD:'</AV><AI>0</AI><Nil /><PI>-1</PI><PC>75</PC><T>Processing</T><SR>-1</SR><SD> </SD></PR></MS></Obj><Obj S="progress" RefId="4"><TNRef RefId="0" /><MS><I64 N="SourceId">1</I64><PR N="Record"><AV>Loading Active Directory module for Windows PowerShell with default drive 'AD:'</AV><AI>0</AI><Nil /><PI>-1</PI><PC>100</PC><T>Processing</T><SR>-1</SR><SD> </SD></PR></MS></Obj><Obj S="progress" RefId="5"><TNRef RefId="0" /><MS><I64 N="SourceId">1</I64><PR N="Record"><AV>Loading Active Directory module for Windows PowerShell with default drive 'AD:'</AV><AI>0</AI><Nil /><PI>-1</PI><PC>100</PC><T>Completed</T><SR>-1</SR><SD> </SD></PR></MS></Obj><S S="Error">New-ADOrganizationalUnit : An attempt was made to add an object to the _x000D__x000A_</S><S S="Error">directory with a name that is already in use_x000D__x000A_</S><S S="Error">At line:1 char:1_x000D__x000A_</S><S S="Error">+ New-ADOrganizationalUnit -Passthru -Name "Terraform" -Description "Terraform _x000D__x000A_</S><S S="Error">Obj ..._x000D__x000A_</S><S S="Error">+ ~~~~~~~~~~~~~~~~~~~~~~~~~~~~~~~~~~~~~~~~~~~~~~~~~~~~~~~~~~~~~~~~~~~~~~~~~~~~~_x000D__x000A_</S><S S="Error">~~~_x000D__x000A_</S><S S="Error">    + CategoryInfo          : NotSpecified: (OU=Terraform,dc=xkln,dc=local _x000D__x000A_</S><S S="Error">   :String) [New-ADOrganizationalUnit], ADException_x000D__x000A_</S><S S="Error">    + FullyQualifiedErrorId : ActiveDirectoryServer:8305,Microsoft.ActiveDirec _x000D__x000A_</S><S S="Error">   tory.Management.Commands.NewADOrganizationalUnit_x000D__x000A_</S><S S="Error"> _x000D__x000A_</S></Objs>

  on ad.tf line 5, in resource "ad_ou" "tf":
   5: resource "ad_ou" "tf" {
Quite a nasty blob, but if we dig through the mess we can see a useful string:
An attempt was made to add an object to the .... directory with a name that is already in use
Creating AD Users and Groups with Terraform
Let’s explore a few other resources types by creating a user and a group. We’re going to append the following to our ad.tf file.
variable TerraformUserPwd {
    type = string
}

resource "ad_user" "tu" {
    principal_name  = "Terrform.User@xkln.local"
    sam_account_name = "Terrform.User"
    display_name = "Terraform User"
    container = ad_ou.tf.dn
    initial_password = var.TerraformUserPwd
    password_never_expires = true
}

resource "ad_group" "tg" {
    name = "TerraformGroup"
    sam_account_name = "TerraformGroup"
    category = "security"
    container = ad_ou.tf.dn
}
While a lot of this looks familiar, we’ve introduced some new HCL elements. The first is the variable resource type. Terraform allows us to define variables in our configuration files which can be supplied at execution time through a number of means: in the terraform apply command line, in a file, or an environment variable.
Once the variable is declared, we can use it inside other resource blocks, in this case we’re using it in the ad_user resource to supply a password for our new account.
It’s worth mentioning that Terraform will create the user with our provided password, but future executions of terraform apply will not attempt to check or update the password. Password changes are one configuration element that Terraform does not track.
You’ll also notice the container property doesn’t reference an actual Distinguished Name, but is actually a reference to our previously created Terraform OU which we labelled tf. If we check back to our state file we can see the DN in the list of attributes.
Let’s create these objects. We can use a PowerShell to supply a randomly generated password.
PS C:\TF> $Pwd = [System.Web.Security.Membership]::GeneratePassword(25,1)
PS C:\TF> terraform apply -var="TerraformUserPwd=$Pwd"
An execution plan has been generated and is shown below.
Resource actions are indicated with the following symbols:
+ create
Terraform will perform the following actions:
# ad_user.tu will be created
+ resource "ad_user" "tu" {
+ cannot_change_password = false
+ container = (known after apply)
+ display_name = "Terraform User"
+ enabled = true
+ id = (known after apply)
+ initial_password = "D>8gOjwr@-2LsLp%Y9RMtF+8t"
+ password_never_expires = true
+ principal_name = "Terrform.User"
+ sam_account_name = "Terrform.User"
}
# ad_group.tg will be created
+ resource "ad_group" "tg" {
+ category = "security"
+ container = (known after apply)
+ id = (known after apply)
+ name = "TerraformGroup"
+ sam_account_name = "TerraformGroup"
+ scope = "global"
}
Plan: 2 to add, 0 to change, 0 to destroy.
Do you want to perform these actions?
Terraform will perform the actions described above.
Only 'yes' will be accepted to approve.
Enter a value: yes
ad_group.tg: Creating...
ad_user.tu: Creating...
ad_group.tg: Creation complete after 4s [id=377d3a3a-290c-4e60-9033-0d47f2525370]
ad_user.tu: Creation complete after 5s [id=0bea5bf0-8cd4-4252-ad52-5e573b1dac5c]
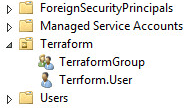
Apply complete! Resources: 2 added, 0 changed, 0 destroyed.Let’s check the server.
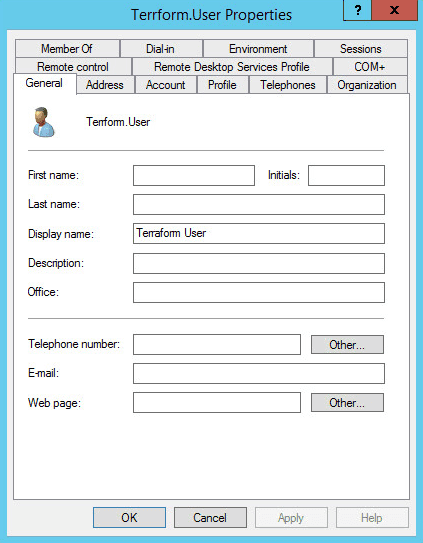
Excellent! Our user account is a little bare though, no First or Last name, and many other attributes could not be configured.
As the AD provides gets more development time these attributes will become available to us.
Creating multiple AD Users with Terraform
Let’s turn things up a notch and demonstrate the power of Terraform. So far we’ve had a 1:1 relationship between how many code blocks we’ve written and how many objects Terraform has created.
Does that mean that if we wanted 100 Users that we’d need to write 100 resource blocks? No, Terraform offers several loop constructs to allow us to write concise code.
Let’s add the following to our configuration file:
resource "ad_user" "labuser" {
    count = 100
    principal_name  = "User${count.index + 1}@xkln.local"
    sam_account_name = "User${count.index + 1}"
    display_name = "UserUser${count.index + 1}"
    container = ad_ou.tf.dn
    initial_password = var.TerraformUserPwd
    password_never_expires = true
}
We set the count property to 100, telling Terraform we want 100 of these objects, and we configure a unique account name by appending the index of each iteration + 1 to each account (so that our first account is User1 instead of User0).
After running terraform apply we have our 100 user accounts.
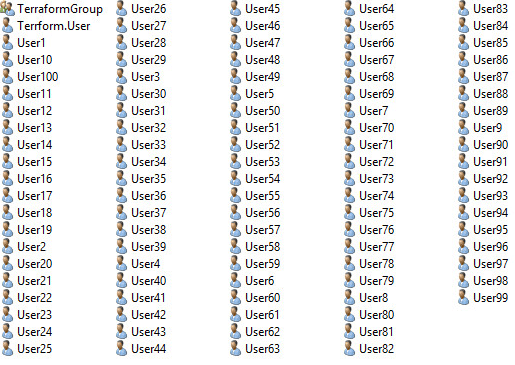
This is fantastic for lab environments, but for a more realistic scenario we could import a CSV that would generate our user accounts, along with generating a different password for each user.
Creating AD GPOs Terraform
If I had to pick one thing that got me excited about the Terraform AD provider it has to be the ability to manage GPOs. Unfortunately there are currently a very limited number of GPO settings we can apply, but this will improve as development continues.
Creating GPOs with the AD provider is a three step process:
- Create the GPO using the
ad_gporesource - Configure the GPO settings
- Link the GPO to an OU using the
ad_gplinkresource
Let’s create our GPO - we’re going to be configuring Event Log retention.
resource "ad_gpo" "evtlog" {
    name   = "Event Log Retention Settings"
}
Now we need to configure the gpo settings:
resource "ad_gpo_security" "gpo_sec" {
    gpo_container = ad_gpo.evtlog.id

    application_log {
        maximum_log_size = 50048
        audit_log_retention_period = 0
    }

    audit_log {
        maximum_log_size = 100032
        audit_log_retention_period = 2
    }

    system_log {
        maximum_log_size = 50048
        audit_log_retention_period = 0
    }
}
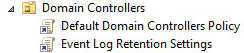
Lastly, we need to link the GPO to an OU. As I have no computers in this test domain, we’re going to link it to the Domain Controllers OU.
resource "ad_gplink" "evtlog" {
  gpo_guid  = ad_gpo.evtlog.id
  target_dn = "ou=Domain Controllers,dc=xkln,dc=local"
  enforced  = false
  enabled   = true
}
Once we apply the configuration we can see our GPO is linked correctly.
Bugs!
Unfortunately there is a bug with the current version (0.1.0) of the GPO provider where certain AD attributes aren’t set which causes the GPO settings to not display and not apply.
There is a workaround in the GitHub issue I submitted, hopefully it gets resolved soon!
Summary
That’s all for now, I believe that in time the Terraform AD provider will become incredibly useful. I also see it as a great way to effectively version control GPOs, something I’ve wanted to do for a long time. With a little more developer love the AD provider is going be a great asset in the admin tool belt.