PowerShell Sleep Duration Accuracy and Windows Timers
Posted on January 23, 2021
- and tagged as
- powershell,
- windows
I’ve previously written about different methods of pausing PowerShell script execution but it’s spread over several unrelated posts and it was never the core topic being covered so I wanted to put it all together into a single place.
You may want to ‘sleep’ or ‘suspend’ a script for a period of time in order to rate limit an action, wait for an asynchronous process, or you may need periodic execution of code at regular intervals. While these may appear to be the same thing (we’re just stopping execution for a while) there is some nuance that should be considered if performing a task where timing accuracy matters.
We’re going to begin with a bit of a deep dive into a cmdlet most are familiar with, Start-Sleep, and then move on to discussing other methods of suspending thread execution and why we may prefer them.
Start-Sleep
This is the simplest way to pause script execution for a length of time. Start-Sleep lets us specify the duration we want to sleep either in seconds, using the -Seconds parameter (which is the default if not specified), or milliseconds, using the -Milliseconds parameter.
There are two factors we need to consider when deciding whether Start-Sleep is an appropriate choice.
- Start-Sleep Accuracy
- Accounting for execution time
Start-Sleep Accuracy
If millisecond level accuracy is required one may assume that Start-Sleep -Millisecond would provide that, but that’s not always the case. Let’s measure the duration Start-Sleep suspends execution for a given sleep value. We can start with the following function.
function MeasureDelay([int]$Sleep) {
    $Start = [System.Diagnostics.Stopwatch]::GetTimestamp()
    Start-Sleep -Milliseconds $Sleep
    $End = [System.Diagnostics.Stopwatch]::GetTimestamp()
    (($End - $Start) * (1000.0 / [System.Diagnostics.Stopwatch]::Frequency)) - $Sleep
}
By using the System.Diagnostics.Stopwatch class we get access to highly accurate timestamps via tick counters which increment 10,000,000 times per second. This can be verified by checking the [System.Diagnostics.Stopwatch]::Frequency field.
PS C:\> [System.Diagnostics.Stopwatch]::Frequency
10000000
We’re running Start-Sleep -Milliseconds 1 100 times and averaging out how long it takes. Let’s see the result.
PS C:\> 1..100 | % {MeasureDelay 1} | Measure-Object -Average | Select -ExpandProperty Average

15.303533
Over 100 iterations our sleep command actually took an average of 15.3ms. This isn’t good news if we need millisecond level accuracy, but let’s have a look at how the accuracy scales if we increase the sleep duration.
We’re going to measure the average additional overhead of Start-Sleep for values from 1ms to 100ms.
1..100 | % {$Sleep = $_; $Avg = 1..100 | % {MeasureDelay $Sleep} | Measure-Object -Average | Select -ExpandProperty Average; "$Sleep,$Avg" | Out-File c:\temp\sleep.txt -Append}Here are the results, courtesy of Excel, because in 2021 PowerBI still won’t let me specify x axis label density (wth?).
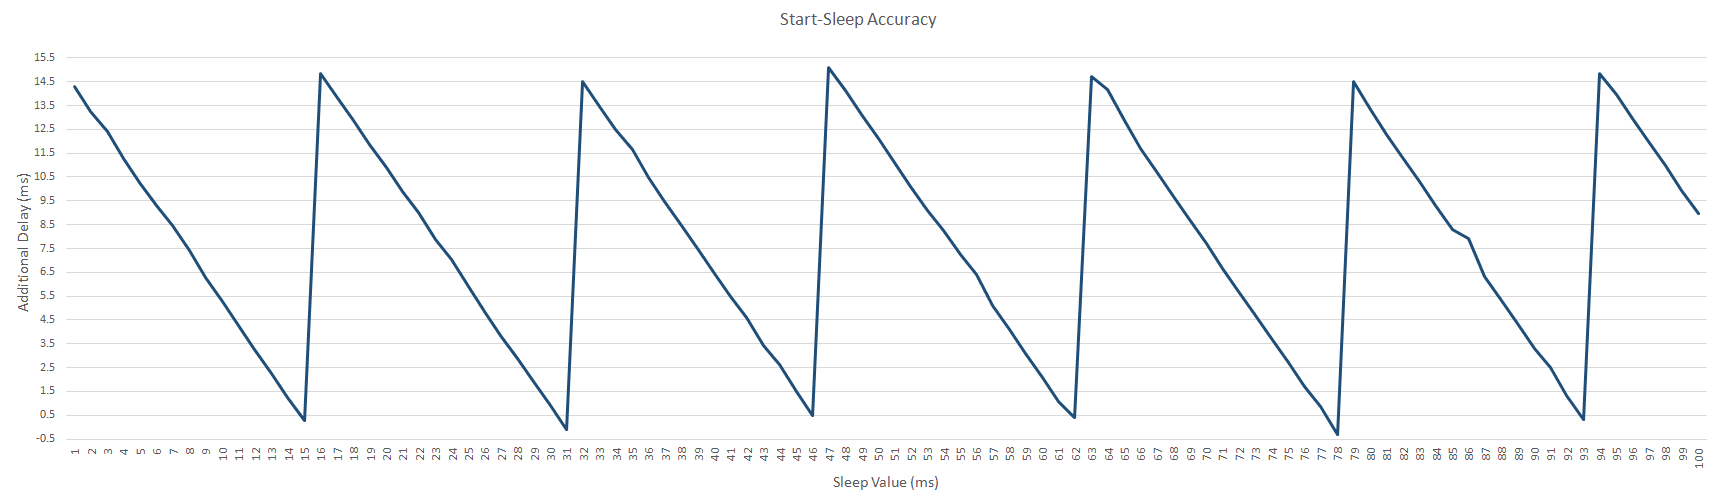
There’s a bit to unpack here. Firstly, remember that this is showing additional delay on top of our requested sleep duration.
As the Start-Sleep value approaches certain values (15, 31, 46, etc.) the extra delay approaches zero, immediately followed by a sudden spike and then another gradual decline to zero. Rinse and repeat.
But why?
To answer this we need to understand how Windows handles timing and thread sleep states.
Running high resolution interrupt timers increases CPU utilization lowers power efficiency. Windows handles these issues by providing lower resolution timers, and these are the timers being used when the MsgWaitForMultipleObjectsEx Win32 API function is called, which is what is ultimately executed when we run Start-Sleep in PowerShell.
Let’s discuss what was mean by low/high resolution timers.
Windows Timer Resolution
We can keep track of time using units of varying granularity.
We can measure time in hours, but this means we lose visibility into how many seconds or minutes have passed. Alternatively we can measure time in nanoseconds and this will give us more accuracy, but is also a lot more work. The System.Diagnostics.Stopwatch class uses accurate (high resolution) timers, but others classes use less demanding timers which have a lower resoluton.
By default on Windows systems the timer interrupts fire at intervals of 15.625ms, or 64Hz (64 times a second). The result is that our thread is put to sleep and the CPU interrupt to wake it doesn’t fire until the timer ticks over, which is 15.625ms away. This is how we get an average sleep time of ~15.3ms for a 1 millisecond sleep command.
As our desired sleep duration approaches the timer resolution the difference between the two is reduced and the additional delay we experience is lowered. We can see at a 15ms sleep, our additional delay is only 0.25ms. At this value the interrupt to wake our thread is fired almost exactly when needed, so there is very little additional delay.
As soon as our desired sleep duration exceeds a multiple of the timer resolution the additional delay immediately spikes and the cycle repeats. At 16 ms we’re back to ~15.01ms of extra wait time.
You’ll notice these numbers aren’t exact; 15.625ms - 1ms doesn’t equal 15.01ms. There are going to be inconsistences as the CPU may have other work to do, the interrupts don’t guarantee that our thread is immediately given processing priority.
I will link to some excellent reading material at the bottom of this post that will dive deeper into the underlying timer operation and its effect on system performance.
Moving away from theory let’s look at some code to determine what our current timer resolution is, and modify it to give us better accuracy.
Determining Windows Timer Resolution With PowerShell
We can query the NtQueryTimerResolution Win32 API to get the currently set timer resolution, as well as the configurable minimum and maximum values.
$NtQueryTimerResolution = @'
[DllImport("ntdll.dll", SetLastError=true)]
public static extern int NtQueryTimerResolution(out int MaximumResolution, out int MinimumResolution, out int CurrentResolution);
'@
$Ntdll = Add-Type -MemberDefinition $NtQueryTimerResolution -Name 'Ntdll' -Namespace 'Win32' -PassThru
$TRMin=0;$TRMax=0;$TRCurrent=0;
[void]$Ntdll::NtQueryTimerResolution([ref]$TRMax, [ref]$TRMin, [ref]$TRCurrent);
Write-Host "Configurable Min: $TRMin, Configurable Max: $TRMax, Current: $TRCurrent"
And the result:
Configurable Min: 5000, Configurable Max: 156250, Current: 156250For a GUI tool I can recommend the Windows System Timer Tool.
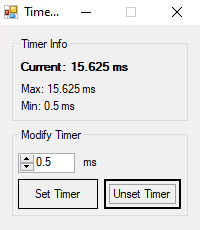
If your current timer differs from the 156250 value then some currently running application has requested the system use more accurate timers.
It’s worth noting that the resolution can be changed by any program, and a snapshot in time may not show the full story as it can rapidly update. Further, while this is a global setting, it doesn’t work quite as one would expect a global setting to work. There will be more on this in a link at the end, especially around changes in Windows 10 2004, but to summarize my experience with PowerShell:
- Regardless of the global timer value PowerShell uses the default ~15.625ms timer
- If we run a function to change the resolution PowerShell will use the lowest value (highest resolution) timer that the system has been globally configured for - this could be the setting we configured, or the setting another application has configured if it is lower than ours.
For example, if another program has set the “global” timer to 0.5ms, and we start PowerShell, it will use a 15.625ms timer. If we then tell PowerShell to use a 1ms timer, it will use the lower 0.5ms timer requested by the other application.
We can now query the current timer, let’s move on to modifying it.
How To Set Windows Timer Resolution With PowerShell
In order to change the timer resolution we need to call two Win32 functions. timeBeginPeriod to set the new resolution, and timeEndPeriod to tell Windows we no longer need our new resolution, which will then set it back to the shortest duration that other programs may have requested, or if there are none, back to the default.
$timeBeginPeriod = @'
[DllImport("winmm.dll", SetLastError=true)]
public static extern uint timeBeginPeriod(uint uPeriod);
'@

$timeEndPeriod = @'
[DllImport("winmm.dll", SetLastError=true)]
public static extern uint timeEndPeriod(uint uPeriod);
'@

$WinMM = Add-Type -MemberDefinition $timeBeginPeriod,$timeEndPeriod -Name 'WinMM' -Namespace 'Win32' -PassThru
Let’s see it in action
# Before changing the timer resolution
PS C:\> 1..100 | % {MeasureDelay 1} | Measure-Object -Average | Select -ExpandProperty Average
14.214025

# Change the timer resolution to 1ms
PS C:\> $WinMM::timeBeginPeriod(1)
0

# Verify the change
PS C:\> [void]$Ntdll::NtQueryTimerResolution([ref]$TRMax, [ref]$TRMin, [ref]$TRCurrent);
PS C:\> Write-Host "Configurable Min: $TRMin, Configurable Max: $TRMax, Current: $TRCurrent"
Configurable Min: 5000, Configurable Max: 156250, Current: 10000

# Run our sleep again
PS C:\> 1..100 | % {MeasureDelay 1} | Measure-Object -Average | Select -ExpandProperty Average
14.387559
What? We’re still at ~14ms delay? Ok, at this point things get a little weird and I’m not exactly sure why. I believe it has to do with PowerShell itself as I tested the underlying Win32 function call and that was far more performant.
There is thankfully a much simpler way than running Win32 functions. A better solution is to use [System.Threading.Thread]::Sleep() instead of Start-Sleep.
Using [System.Threading.Thread]::Sleep() with PowerShell
First let’s update the MeasureDelay function to use [System.Threading.Thread]::Sleep() instead of Start-Sleep.
function MeasureDelay([int]$Sleep) {
    $Start = [System.Diagnostics.Stopwatch]::GetTimestamp()
    [System.Threading.Thread]::Sleep($Sleep)
    $End = [System.Diagnostics.Stopwatch]::GetTimestamp()
    (($End - $Start) * (1000.0 / [System.Diagnostics.Stopwatch]::Frequency)) - $Sleep
}
Let’s re-run our tests.
# Re-run our test using the updated function
PS C:\> 1..100 | % {MeasureDelay 1} | Measure-Object -Average | Select -ExpandProperty Average
0.88616 # <-----

# Run timeEndPeriod() to allow the system timer to return the default value
PS C:\> $WinMM::timeEndPeriod(1)
0

# Re-run our test using the updated function and default timers
PS C:\> 1..100 | % {MeasureDelay 1} | Measure-Object -Average | Select -ExpandProperty Average
14.227977
There we go, that is much better - 0.886ms of additional delay compared to ~15ms.
Keen readers may have noticed that our minimum valid value for the timer resolution is 0.5ms, but the timeBeginPeriod function accepts milliseconds in integers. We have no way of specifying 0.5ms as an integer using milliseconds.
We need to call a different function to get 0.5ms resolution.
Setting 0.5ms Timer Resolution with PowerShell and NtSetTimerResolution
The reason I’ve put this separate is that the NtSetTimerResolution function we need to call is not officially documented by Microsoft. Unofficial docs can be found here, and we can use them to build our PowerShell code.
$NtSetTimerResolution = @'
[DllImport("ntdll.dll", SetLastError=true)]
public static extern int NtSetTimerResolution(uint DesiredResolution, bool SetResolution, out uint CurrentResolution );
'@

$NtdllSet = Add-Type -MemberDefinition $NtSetTimerResolution -Name 'NtdllSet' -Namespace 'Win32' -PassThru

$TRCurrent=0
[void]$NtdllSet::NtSetTimerResolution(5000, $true, [ref]$TRCurrent);
This has set our timer resolution to 0.5ms, let’s confirm and re-run the test.
# Confirm timer resolution is set to 0.5ms
PS C:\> $TRMin=0;$TRMax=0;$TRCurrent=0;
PS C:\> [void]$Ntdll::NtQueryTimerResolution([ref]$TRMax, [ref]$TRMin, [ref]$TRCurrent);
PS C:\> Write-Host "Configurable Min: $TRMin, Configurable Max: $TRMax, Current: $TRCurrent"
Configurable Min: 5000, Configurable Max: 156250, Current: 5000

# Re-run our test using
PS C:\> 1..100 | % {MeasureDelay 1} | Measure-Object -Average | Select -ExpandProperty Average
0.130233
Even better accuracy than before. As a final demo I’m going to re-create the graph shown earlier using the new timers.
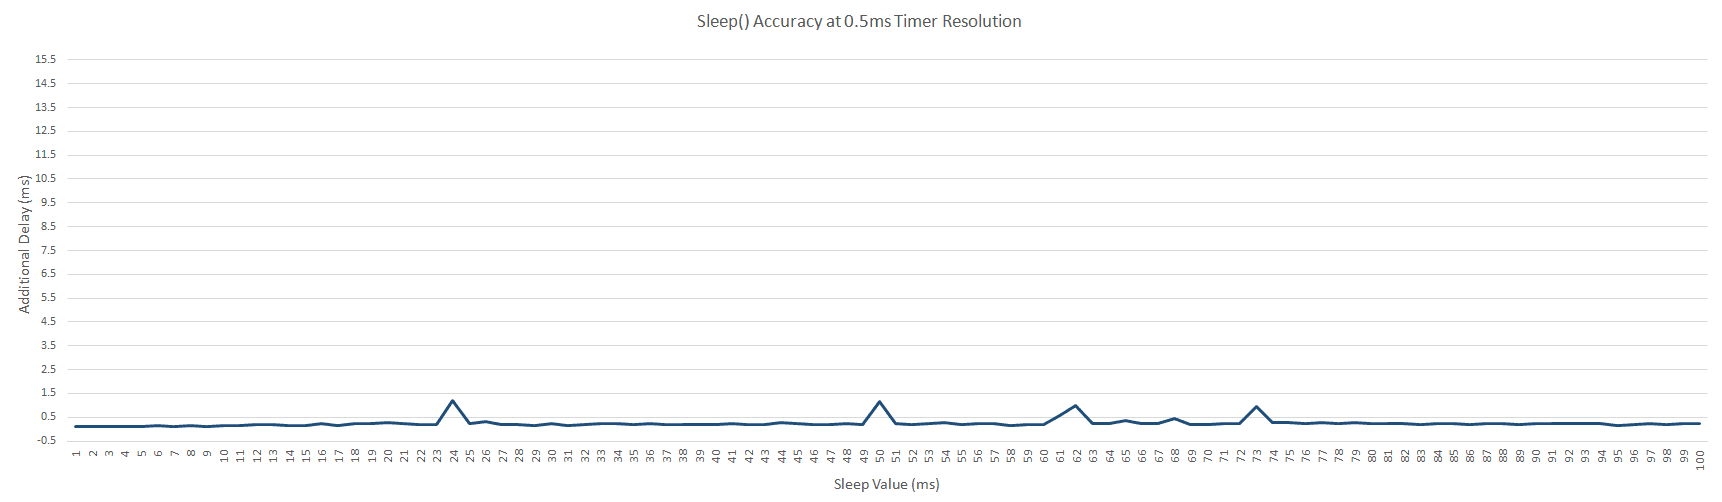
I’ve left the min/max y axis values identical to the previous chart so we can easily compare. There are a few bumps along the way, illustrating that this still isn’t perfect, but the improvement is clear.
We’ve covered Start-Sleep accuracy, but we haven’t talked about execution delay - that is, how can we ensure our code runs at regular intervals, accounting for however long the code that is doing the actual work may take.
Let’s look at how we can achieve that.
Accounting For Execution Time
Suppose we have a snippet of code as follows:
While ($true) {
    DoSomething
    Start-Sleep -Seconds 1
}
At what interval would our loop iterate? Well, that depends on how long the DoSomething function takes - our interval is DoSomething execution time + 1 second. Perhaps this variance is fine, perhaps not, it depends on what level of accuracy and precision we need to achieve.
Often we start a sleep because we need to wait for some asynchronous task to complete, in this case it’s probably fine as accuracy isn’t paramount. However, if we’re collecting performance data then this drift can become a problem.
One solution is to use the [System.Timers.Timer] class to fire events at regular intervals.
System.Timers.Timer Event Subscriptions with PowerShell
Imagine we’re pulling raw data that is used to calculate a value that has a time factor, for example, megabits per second, or CPU utilization (which is a calculation of how much time the processor spent in a busy state during the polling period). The way these counters often work is they provide an ever increasing value that is polled periodically. The difference between the latest and previous value is then calculated, which gives us the cooked value for the poll duration (usually 1 second).
In PowerShell we can write this data polling as follows (we don’t particularly care about the inner working of how we calculate the cooked value, so we’re going to abstract that away in a function call).
While ($True) {
    Get-Data # This blackbox function is doing the polling and calculations for us
    [System.Threading.Thread]::Sleep(1000) # We sleep for 1 second before re-polling
}
This looks fine on the surface until we notice that, for whatever reason, Get-Data takes 200ms to do its work. Our loop now executes every 1.2 seconds which will result in skewed computation - we’re assuming we’re polling our resource every second, but it’s actually every 1.2 seconds.
We need a way to ensure Get-Data is executed every second - regardless of how long it takes to run. One way to accomplish this is with the Timers.Timer class and event subscriptions. Let’s show some sample code.
To demonstrate this in action we’re going to replace Get-Data with a different function.
function Write-TimeStamp {
    [System.Threading.Thread]::Sleep(500)
    [System.DateTime]::Now.ToString("HH:mm:ss.fff") | Out-File ts.txt -Append
}
This function will first sleep for half a second, simulating some work that needs to be performed, then write the timestamp (our “data”) to a file. Let’s try this with a normal loop.
While ($True) {
    Write-TimeStamp
    [System.Threading.Thread]::Sleep(1000)
}
This is what we get after a few seconds.
20:36:41.866
20:36:43.378
20:36:44.889
20:36:46.400
20:36:47.912
20:36:49.428
20:36:50.940
20:36:52.452
20:36:53.963
20:36:55.479
As expected, our polling is all over the place, we can see a jump from 41.866 seconds to 43.378, and the millisecond differences each iteration. Definitely not the accuracy we’re after. Let’s try the same function but using intervals and event subscriptions.
$Timer = New-Object -Type Timers.Timer
$Timer.Interval = 1000
Register-ObjectEvent -InputObject $Timer -EventName Elapsed -SourceIdentifier TimerEvent -Action {
    Write-TimeStamp
}
$Timer.Start()

# Cleanup after we're finished collecting data
$Timer.Stop()
Get-EventSubscriber | Unregister-Event
Get-Job | Remove-Job
Here are the results:
20:39:50.108
20:39:51.235
20:39:52.048
20:39:53.173
20:39:54.298
20:39:55.111
20:39:56.250
20:39:57.062
20:39:58.187
20:39:59.313
20:40:00.126
While it’s not perfect it is a significant improvement. However, I think we can do better. One of the downsides of this method is that is uses PSJobs - that is, a new job is created each time the Elapsed event fires. This can be an issue, for example, if you need to output to the console, but it also adds a good amount of overhead - computationally, jobs aren’t free.
So what is an alternative? Let’s look at System.Stopwatch.
System.Stopwatch
We’ve used the System.Stopwatch class previously to get accurate timing measurements for our snippets, we’re now going to use it to enable our code to run at precise intervals.
We’re going to be reusing the Write-TimeStamp function, but let’s change the encapsulating code.
$Freq = [System.Diagnostics.Stopwatch]::Frequency
While ($True) {
    $Start = [System.Diagnostics.Stopwatch]::GetTimestamp()
    Write-TimeStamp
    $End = [System.Diagnostics.Stopwatch]::GetTimestamp()
    [System.Threading.Thread]::Sleep(1000-(($End - $Start) * (1000.0 / $Freq)))
}
We’re taking accurate measurements of how long Write-TimeStamp took to execute, then subtracting that from our 1000ms desired sleep. A benefit of doing the calculation each iteration is that it accounts for fluctuations in execution time which wouldn’t be the case if we simply lowered our sleep duration by a fixed amount.
Let’s see the results.
20:58:35.212
20:58:36.212
20:58:37.212
20:58:38.213
20:58:39.213
20:58:40.213
20:58:41.214
20:58:42.214
20:58:43.215
20:58:44.215
That’s more like it!
If your drift is higher than what I’ve shown here it could be there is more CPU load on your system. One way around this is to increase PowerShell process priority, though I wouldn’t recommend doing this on production systems, unless PowerShell is the production process.
Graphical Comparison
For the visually inclined, here is a graphed comparison of all three methods of interval based execution.
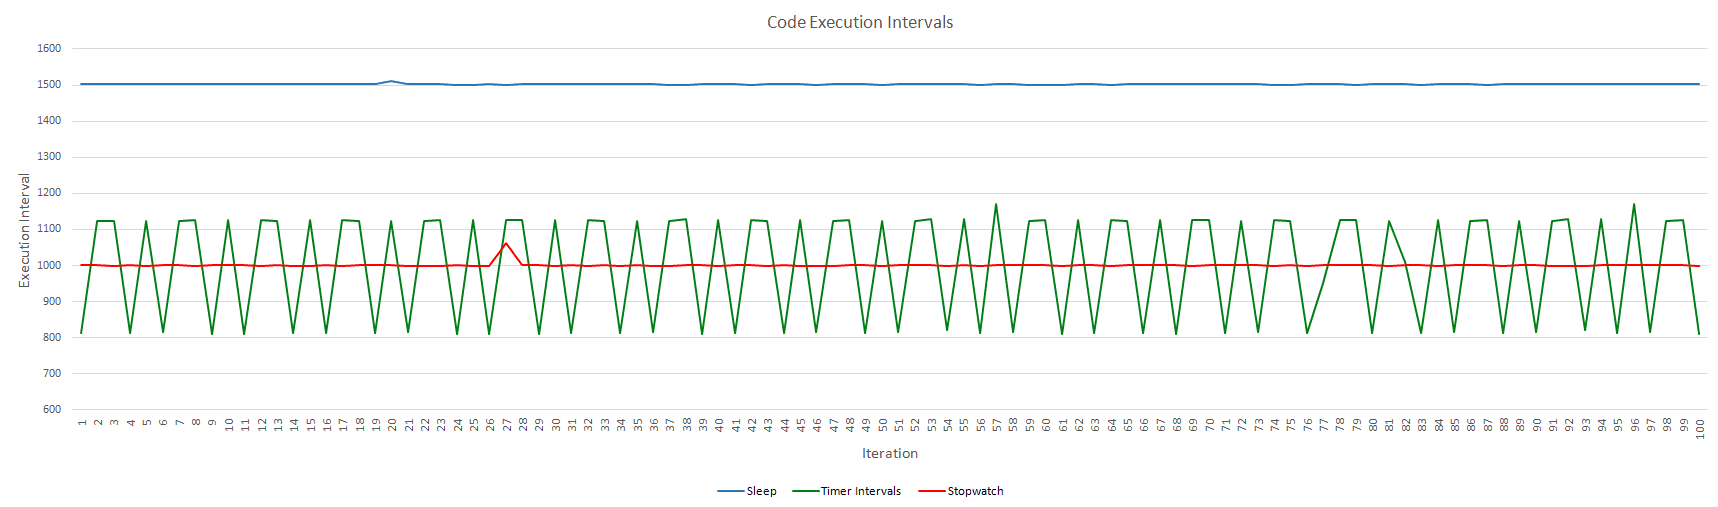
This is showing the execution interval between each iteration. The closer to 1000 the better.
Summary
Despite everything I’ve written, for the vast majority of PowerShell code where ~15ms makes no difference Start-Sleep should remain the default cmdlet you reach for. Readability and simplicity matter.
When sub 15ms accuracy is desired, changing the timer resolution and using the [System.Threading.Thread]::Sleep() method is a good way to go.
And if you need to account for execution time and run code at precise intervals, the [System.Diagnostics.Stopwatch] class provides the tools to enable us to do just that.
Consistency and Testing
This post has taken an absurd amount of time to write because of the inconsistent results I witnessed between different systems. All of the data in this post was from a Windows 10 2004 machine.
One of the posts in the further reading section will detail recent timer behavior changes to Windows 10.
My recommendation to anyone needing timing accuracy with PowerShell is to use the code in this post to test and confirm that you’re getting the desired level of accuracy on your system.
Further Reading
Here are a few exceptionally well written articles by Bruce Dawson. He goes on to explain many of the underlying concepts and mechanisms of Windows timers in more detail than I have covered here.
- Windows Timer Resolution: The Great Rule Change
- Sleep Variation Investigated
- Windows Timer Resolution: Megawatts Wasted
That’s all for now, I’m going to go lie down and [System.Threading.Thread]::Sleep(43200000).